The front pump is the only part of a 700R4 that is working every second the engine is running. It is driven straight off the converter hub, it makes every pound of line pressure the clutches and bands ever see, and it carries the pressure regulator, the boost valve and the converter feed. When it starts to go, the symptoms rarely say "pump." They show up as a whine that will not go away, a slow engagement on a cold morning, a 3-4 clutch that burns up twice, or a front seal that leaks again a week after you replaced it. Below: how the pump works, how it fails, how to tell it from the things that imitate it, and the bench checks that decide rebuild or replace.

How the 700R4 pump makes pressure
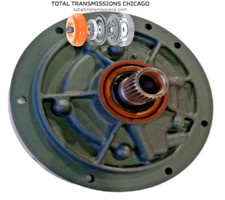
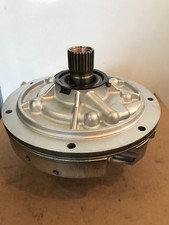
The 700R4 uses a variable-displacement vane pump, not the fixed gear pump of the TH350 and TH400. The converter hub drive lugs turn a rotor. Sliding vanes ride in slots in that rotor, and two vane rings sit inside the rotor to keep the vanes pushed out against a movable slide. The slide pivots on a pin, and one or two priming springs push it toward its maximum-output position. As line pressure builds, regulated oil is fed to the decrease side of the slide and swings it back toward center, cutting displacement. Output is high at idle and drops at cruise, which saves horsepower.
That design gives you more ways to lose pressure than a gear pump, and because the pressure regulator and boost valve live in the same pump body, a worn bore there reads exactly like a weak pump on a gauge. Sonnax's 4L60-family rebuild article puts it bluntly: "A binding slide can often be the cause of otherwise unexplained low line pressure."
Rotor and spring versions
Over the 1982-1993 run, 700R4 pumps were built with 7-vane, 10-vane and 13-vane rotors, and they do not all take the same priming spring setup. TransGo's instruction sheet for its 700 PK pump kit (IS-700-PK) spells it out: 13-vane and 10-vane pumps get both springs, 7-vane pumps behind a high-output engine get both springs, and 1982-86 7-vane pumps on diesel or standard gas engines get the outer spring only. Count the vanes before you order a rotor kit or a spring, because mixing parts across versions is how a "rebuilt" pump comes back low on pressure.
The failure modes that actually happen
1. Slide binding and a worn pivot pin
Varnish, debris or a slightly distorted pump body can keep the slide from swinging freely. A slide stuck toward low output starves the unit at idle; one stuck toward full output keeps the regulator working overtime. Sonnax calls out the pivot pin specifically as something to check and replace, and sells it as a service part (65797) for both low and high line pressure complaints.
2. Broken vane rings
This is the failure that takes everything with it. TransGo's 700 PK sheet says original rings are brittle, and that when one breaks it usually "takes the trans and the converter along with the pump." The pieces gouge the rotor pocket and send iron through every circuit and into the converter. TransGo's hardened steel rings are rated by engine rpm: the standard kit is for engines that rev under 5500 rpm, with a separate kit for engines that rev higher.
3. Pressure loss at high rpm
On a modified engine that spins the pump past what GM designed it for, pressure builds on the slide's decrease side and overcomes the priming springs. The slide swings toward minimum output at exactly the moment you need full volume, so line pressure drops on wide-open-throttle upshifts. The 3-4 pack usually pays for it. A stiffer slide spring (Sonnax 77722-01K) or a TransGo spring paired with its high-rpm ring kit is the standard fix on performance builds.
4. Worn regulator and boost valve bores
The pressure regulator and boost valve sit in aluminum bores in the pump body. Sonnax notes that "boost valves are notorious for leaking," especially with high line pressure, and that the boost sleeve moves in the pump and wears its bore. A worn regulator valve bore causes line pressure that hunts or will not hold steady. A stronger spring will not fix either one. A worn bore needs an oversize valve, an O-ring boost sleeve, or a different pump body.
5. Cross leaks in the cover and stator tube
The pump cover and stator support carry the forward, overrun, 3-4 and reverse clutch feeds plus converter charge oil. Sonnax's vacuum-testing article lists where those circuits leak: the three core-drilled cup plugs, a cover warped from heat, a warped cover-to-body face, and a cracked stator tube (including a new tube that was cracked when it was pressed in). The symptoms it ties to those leaks are clutch failures across reverse, 3-4, forward, overrun and TCC, plus TCC codes and chatter and fluid pushing out the vent.
6. Pump bushing and converter hub wear
The pump bushing carries the converter hub. Once it wears, the hub wobbles in the front seal and the seal keeps leaking. If a 700R4 has had two front seals in a year, measure the bushing and check the hub for a groove or bluing before installing a third. Sonnax sells a bimetal PTFE-lined pump bushing (77005T) for this exact wear.
7. Broken drive or rotor from bad converter engagement
If the converter is not fully engaged in the pump, the hub lugs sit on the edge of the rotor drive instead of all the way in. Sonnax documents this on the 4L60-E with a 300 mm converter: with the transmission bolted to the engine and the converter pushed in until the drive slot bottoms on the pump lugs, the gap between the flex plate and the converter pads should be 0.125" to 0.250". Under 0.125" can damage the pump. Over 0.250" makes pump gear failure likely. The 700R4 shares that drive design, so check the gap on every install, especially after an engine or flexplate swap. A converter that is not fully seated can break the pump drive on the first start.
Symptoms, and the things that imitate them
- Whine that follows engine rpm in every range, including Park and Neutral. The pump turns whenever the engine turns, so a pump whine does not care what gear you are in. Noise only in gear points elsewhere.
- Slow engagement into Drive or Reverse, worst on a cold start or after the truck has sat. That is a pump that is losing prime or not picking up oil. Check the fluid level hot before blaming hard parts. GM's preliminary information bulletin PIP4379K, written for the Allison 1000 but describing the same principle, ties delayed engagement to "no or excessively low pump pressure as a result of a no prime or loss of prime condition," says low fluid makes it worse on a cold start, and says to inspect the suction filter for cracks once the level is confirmed correct. A cracked filter or a bad filter seal on a 700R4 does exactly the same thing.
- Slipping under load, a burnt 3-4 pack, or a band that keeps burning. Low line pressure from the pump is one cause. A misadjusted TV cable is a far more common one on this unit. Rule out the TV cable first.
- Front seal that keeps leaking. Bushing or hub wear, or a crooked seal.
Diagnosing it in the truck
- Set the fluid level hot (specs in our 700R4 fluid guide) and look at it. Bright steel chunks point to broken rings or vanes. Brass flakes point to bushings.
- Verify TV cable adjustment. On the 700R4 the cable sets line pressure. A loose cable reads as a weak pump on a gauge.
- Put a gauge on the line pressure port and compare idle, stall-range and full-TV readings against the factory spec for your application in the GM service manual. A pump problem usually reads low at idle and stays low as TV is pulled, often worse hot. A sticking regulator or boost valve reads erratic.
- Listen in Park and Neutral at a few rpm levels. A whine there that rises and falls with rpm is a pump or a cavitating pickup until proven otherwise.
- Drop the pan and check the filter. Look at the neck, the seal and the body for cracks, and look at the debris on the magnet.
What to check on the bench
Once the pump is out, these are the checks that decide whether it gets rebuilt or replaced.
- Slide shake test. Per Sonnax: assemble the clean, dry pump halves with only the slide inside and shake it. You should hear the slide move.
- Pivot pin, vanes and rings. Replace a worn pin. Look for cracked rings and vanes with chipped edges. If you reuse vanes, TransGo says to put their worn break-in flats against the new rings or the rotor may not turn freely. With new vanes, a few strokes on emery cloth makes the flat.
- Pocket and face wear. Scoring in the rotor pocket or cover face is volume loss you cannot fix with parts. File or flat-sand both mating faces to remove dings and high spots that cause cross leaks.
- Vacuum test every circuit. Sonnax's numbers: a sealed component pulls 25 in-Hg. With the body bolted to the cover, a 1 in-Hg drop to 24 is acceptable. Around 23.5 in-Hg means resurface and retest. Test forward, overrun, 3-4 and reverse feeds, and vacuum test the boost valve, the pressure regulator valve and the pressure relief checkball.
- Stator tube alignment. If you swap a stator shaft, Sonnax warns the factory pin location varies by as much as .050" between units. Pressing a mismatched pair shaves the pin, tilts the shaft, and gouges the cover bore into a cross leak. Use alignment studs, redrill to 7/16" (or 1/2" for severe misalignment), and lock the pin with Loctite 609 and a stake. After assembly, check stator runout with a dial indicator and rework anything over a few thousandths.
- Bushings. Replace the pump bushing and both stator support bushings. Press them in with an arbor press, not a hammer and driver.
Rebuild the pump or replace it?
If the body and cover pass the vacuum tests, the pocket is clean, and the regulator and boost bores are tight, a rotor and slide kit, new rings, a pivot pin, a bushing and a seal is a good repair. Once you are looking at a scored pocket, a worn regulator bore, a warped cover or metal from broken rings, a complete pump assembly is usually cheaper than the machine and parts time. Match the assembly to the year and to the pump you removed. GM revised the 700R4 pump during the run, and suppliers sell the 1987-1993 auxiliary valve body style pumps separately from the earlier ones, so compare the old and new pumps side by side before installing. Whichever way you go, flush the cooler and lines after any pump failure that made metal. Otherwise the debris comes straight back into the new pump on the first drive.
FAQ
What are the symptoms of a bad 700R4 pump?
The most common signs are a whine that rises and falls with engine rpm in every range including Park and Neutral, slow engagement into Drive or Reverse that is worst on a cold start, slipping or burnt clutches from low line pressure, a front seal that keeps leaking, and bright steel pieces in the pan from broken vane rings. A misadjusted TV cable causes low pressure too, so rule it out before condemning the pump.
How do I tell pump whine from torque converter noise?
The pump turns any time the engine runs, so a pump whine is there in Park and Neutral and changes with rpm. A noise that only appears once the transmission is in gear, or only under load, points more toward the converter, a planetary or the filter. Check the fluid level hot first, because low fluid and a cracked filter make the pump cavitate and whine as well.
Can I rebuild a 700R4 pump or should I replace it?
If the pump body and cover pass vacuum testing, the rotor pocket is not scored, and the pressure regulator and boost valve bores are tight, a rotor and slide kit with new rings, pivot pin, bushing and seal is a sound repair. A scored pocket, a worn regulator bore, a warped cover, or metal from broken rings usually makes a complete pump assembly the cheaper fix. Flush the cooler and lines after any failure that made metal.
How many vanes does a 700R4 pump have?
700R4 pumps were built with 7-vane, 10-vane and 13-vane rotors. TransGo's pump kit instructions say 10- and 13-vane pumps use both priming springs, 7-vane pumps behind high-output engines use both, and 1982-86 7-vane pumps with diesel or standard gas engines use only the outer spring. Count the vanes before ordering rotor parts or springs.
Sources
- Sonnax — "All Over the Map: Attacking 4L60/E Burnt 3-4 Clutches with Confidence," tech resource. Backs the slide shake test and the binding-slide-to-low-line-pressure link, the pivot pin check, the boost valve leakage and boost sleeve bore wear, vacuum testing the pressure regulator valve and relief checkball, flat-sanding the pump faces, stator runout checking, and replacing the stator support bushings. sonnax.com
- Sonnax — "4L60/E Pump Cover & Stator Tube: Finding Hidden Leaks with Individual Vacuum Testing," tech resource. Backs the circuits tested, the 25 / 24 / 23.5 in-Hg vacuum benchmarks, the leak locations (cup plugs, warped cover, cracked stator tube), and the clutch failures, TCC codes and vent leakage those leaks cause. sonnax.com
- Sonnax — "Overall Height Issues and Pump Gear Problems: 4L60-E, 300mm Converter," tech resource. Backs the 0.125"-0.250" flexplate-to-converter-pad gap, how to measure it, and pump damage when the converter is not engaged correctly. sonnax.com
- Sonnax — "4L60, 4L60-E Stator Shaft & Pump Cover Assembly Tips," tech resource. Backs the up-to-.050" alignment pin variation, the gouged-bore cross leak from pressing mismatched parts, the 7/16" and 1/2" redrill sizes, Loctite 609 and staking, and the alignment stud method. sonnax.com
- TransGo — 700 PK NoYoYo Standard Pump Kit instruction sheet (IS-700-PK), 700R4 / 2004R / 4L60E. Backs the brittle OE ring failure and the damage it causes, the under-5500-rpm rating of the standard kit, the priming spring guidance by 7/10/13-vane rotor and year, and the vane break-in flat procedure. TransGo instructions (PDF)
- General Motors — Preliminary Information PIP4379K, "Delayed Or No Drive And Or Delayed Or No Reverse," October 2013 (NHTSA document MC-10112401). Written for the Allison 1000. Cited here only for the general principle: delayed engagement from no prime or loss of prime in the pump, low fluid making it worse on cold starts, and checking the suction filter for cracks after the level is confirmed. static.nhtsa.gov