A 722.6 or 722.9 that has dropped into limp home mode is not picking a gear. That is the first thing to get straight, because it changes how you diagnose it. Mercedes calls it the emergency running function, and per the OEM service information for the 722.6 (sold to Chrysler as the NAG1), what actually happens is that the control module de-energizes every solenoid and regulating valve in the unit. Nothing is commanded. What you are driving on afterward is whatever the hydraulic circuit falls back to with zero electrical input.
That fallback has three consequences the service information spells out: the last engaged gear stays engaged, modulating and shift pressures rise to their maximum levels, and the converter lockup clutch is deactivated. The car does not slam into second while you are doing 70. It holds whatever gear it was in, and it holds it hard, because line pressure just went to the moon.
The second gear everybody talks about comes later. The documented recovery is: stop, shut the engine off, select P, wait at least ten seconds, restart. D then gives second gear and R gives reverse. Limp home stays active until the DTC is corrected or erased with a scan tool, though sporadic faults clear on an ignition cycle, which is exactly why the car "fixed itself" on the way to your shop.

Use limp mode itself as your first diagnostic
Because limp home is a full electrical shutdown, the way the car behaves in it tells you something before you plug anything in. The 722.6 gear ratios are 3.59, 2.19, 1.41, 1.00 and 0.83 with a 3.16 reverse, and the service information lists a separate reverse-in-limp ratio of 1.93 with its own clutch application. If the car pulls cleanly in second and backs up under its own power with everything de-energized, the pump, the clutch packs and the mechanical fallback circuit are all doing their job. You have an electrical or control problem. If it slips, flares or will not move in limp, you have a hydraulic or mechanical problem that the electronics were masking, and no conductor plate is going to fix it.
Ask whether the complaint started as a shift quality issue. A 722 that flared for months before it started shutting down is telling you a very different story than one that went from perfect to limp overnight.
Cause 1: the N2 and N3 speed sensors on the conductor plate
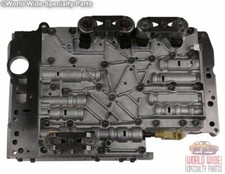
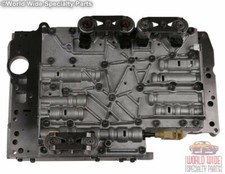
This is the famous one, and it deserves its reputation. On the 722.6 the two input speed sensors are part of the electrohydraulic control unit, the conductor plate. Per the OEM description, N2 reads the front sun gear off the externally toothed disc carrier of clutch K1, and N3 reads the front planet carrier off the internally toothed disc carrier of K1. Both are fixed to the shell of the control unit by contact blades and spring-loaded against the housing, which is what sets the defined air gap to the exciter ring.
Two things kill them. First, the sensors are magnetic and sit in a bath of fluid, so they collect steel; a plate that is otherwise fine can drop signal because the pickup face is furred over with debris from a wearing K2 bushing. Second, the sensor goes intermittent with heat. The module compares N2 and N3 against each other and against engine and wheel speed, and when one drops out it cannot calculate what gear the unit is in, so it shuts the solenoids off.
Graph N2 rpm and N3 rpm together and drive the car. In a steady gear both traces should be smooth and proportional and should track engine rpm through the converter. You are hunting a momentary drop to zero or a spike, usually after twenty or thirty minutes when the fluid is fully hot. A single-frame dropout shows up on a graph and never shows up on a numeric list, so use graph mode.
722.6 Conductor Plate, Filter & Gasket Service Kit
Plate, filter and pan gasket in one box, so the sensor job and the service happen on the same teardown instead of two.
View the kit →Cause 2: the 13-pin connector and fluid in the harness
The conductor plate ties to the outside world through a single 13-pin plug connector with a bayonet lock, which is also how the wiring harness reaches the transmission control module. The OEM diagnostic tables list "leak in area of control unit (valve body) electrical connector" as a checkable cause with the correction being to inspect the connector for damaged, cut or missing O-rings.
What the table does not say out loud is where that fluid goes: it wicks up inside the harness and ends up in the control module. On a car with intermittent limp mode plus communication faults, pull the connector and look at the pins. If they are wet, a conductor plate alone is a comeback waiting to happen. Replace the connector sleeve and O-rings, and check the module end of the harness before you condemn anything expensive.
Cause 3: the hydraulic cause everybody misses
Here is where a lot of 722 jobs go sideways: the car sets a ratio or slip code, the shop replaces the conductor plate, and it comes back in limp mode three weeks later.
Sonnax TASC Force member Mio Cundl documented the mechanism: the outer bore of the working pressure regulator valve wears and lets pMod solenoid signal oil leak past the boost end of the valve. As the casting wears, working pressure stops rising with engine load, and you get flare or outright loss of a gear on the shift. His account of the 1998 warranty work is direct about the result, noting that many high-mileage cars had a 2-3 flare causing the vehicle to go into limp mode. The valve is a long one-piece design, so when it is leveraged on the large end it also loads the bore on the smaller inboard end, and both wear areas show up on a vacuum test or a careful visual inspection.
The same signal circuit runs through the 1-2/4-5, 2-3 and 3-4 overlap sleeves, which wear on the I.D. and leak at the O.D. Wear at any of them drops pressure at the working pressure valve, so three individually minor leaks add up to a shift the module reads as a slip, and a slip it reads long enough becomes a shutdown.
The Sonnax vacuum test guide for the 722.6/NAG1 maps the test locations and the parts that go with them. The ones that matter for a limp complaint: the pressure regulator valve, listed for low line pressure, no 2-3, 4-3 neutral, soft shifts under acceleration, slip codes and delayed engagement, corrected with the oversized valve kit 68942-07K or the oversized sleeve 68942-06; the regulating valve pressure control, listed for delayed engagement, low line rise and long shift duration and shift codes, corrected with 68942-17K; and the shift pressure regulating valve on the B2 shift valve circuit, listed for shift concerns in all forward gears, shift codes, burnt B2 brake and slipping in 1st, 2nd and 3rd. The overlap control kits are 68942-19K for 1-2/4-5, 68942-27K for 2-3 and 68942-31K for 3-4. All of the oversized kits need their matching reamer fixture and a VB-FIX, so price the tooling into the job before you promise a turnaround.
Test at rest position unless the instruction sheet says otherwise, and treat a low reading as wear. If the bores test good and the springs are intact, you have earned the right to blame the electronics.
What is different on the 722.9
The 722.9 seven-speed has its own signature wear point. Sonnax describes the supply pressure regulator as the valve controlling pressure fed to the solenoids, functioning much like the solenoid pressure regulators in Ford units. Wear in either or both of those bores allows fluid loss that prevents proper regulation of solenoid supply pressure, and the listed results are harsh or soft shifts, solenoid performance codes, wrong gear starts, TCC apply issues and clutch failure. The correction is to recondition the bore and fit oversized valve 88740-02, which fits either location.
Pay attention to "wrong gear starts" and "solenoid performance codes" on that list. Those are exactly the symptoms a tech reads as a failed conductor plate on a 722.9. The 722.9 also has an oversized working pressure regulator valve, 88740-01, listed for burnt clutches, erratic line pressure, low converter and lube flow, and overheating; note that Sonnax's own valve body layout sheet flags 88740-01 as no longer in production, so check distributor stock before you plan around it.
Scan tool work: the numbers worth watching
Beyond N2 and N3, three data points earn their screen space.
Converter clutch slip, actual versus desired. ATRA's GEARS Magazine walkthrough of a P0741 on a NAG1 lays out the operating logic: the converter clutch is always slipping somewhere between 5% and 95% when engaged depending on vehicle speed and engine load, and the status PID reports one of four modes, open, open-slip, slip and slip-open. The module only compares actual slip to desired slip during slip mode, and P0741 sets when that slip exceeds 60 rpm in slip mode three times in one key cycle. If actual and desired track each other cold and split apart after thirty minutes of highway driving, the problem is in the transmission, not the module.
Engine load percentage. The same article gives the sanity range: roughly 10 to 20 percent at idle, rising to 90 to 100 percent at wide-open throttle in gear. Working pressure on a 722 is load-sensitive, so a load PID that reads wrong feeds a pressure command that is wrong. If load looks off, go check the MAF and throttle position sensor before you drop a pan.
Commanded versus actual solenoid duty cycle. Back-probe the solenoid command wire and record it against the scan tool value in graph mode. Excessive deviation between what the tool says is commanded and what is actually on the wire points at a module power or ground fault, or a module failing internally, not at anything inside the transmission.
Fluid: the cause nobody writes on the repair order
Wrong or degraded fluid shows up as pressure and adaptation problems, and those show up as codes. The 722.9 built through mid-2010 calls for MB 236.14, the red ATF 134; later 7G-Tronic Plus units moved to MB 236.15, ATF 134 FE, a lower-viscosity fluid that is not interchangeable with the older red. Earlier 722.6 units run the MB 236.10 and 236.12 red specs. Mercedes publishes the approved product list per sheet number, and that list, not the label on the jug, decides whether a fluid is approved.
The OEM level procedure matters as much as the fluid. Level is checked on flat ground with the engine running and the unit warmed, and the service information is explicit that true transmission oil temperature can only be read with a scan tool. Use the 9336 dipstick, push it until the tip contacts the pan, and read it running. Wipe the cap and fill tube first; the manual calls out debris falling down the tube as a contamination path.
The contamination list in the service information is worth reading to a customer who wants to argue about a flush: incorrect fluid added, a dirty dipstick and fill tube, coolant entering the fluid, internal debris, overheat sludge, and failure to replace a contaminated converter after a repair. If you find coolant, the only remedy given is to replace the radiator, since the cooler in it is not serviceable, and if coolant has circulated through the unit you are overhauling it.
The order I actually work it
- Read and record codes, then note whether the car drives in limp and whether reverse works. That splits electrical from mechanical before you touch a wrench.
- Check fluid level and condition by the OEM procedure, with a scan tool temperature reading.
- Graph N2 and N3 hot, on the road, in graph mode, for at least thirty minutes.
- Pull the 13-pin connector and inspect for fluid, damaged or missing O-rings, and a wet harness.
- Drop the pan and look at the debris. Steel on the sensor magnets and in the filter changes what the plate is telling you.
- If the history includes flare, bang or a slip code, pull the valve body and vacuum test the working pressure regulator, the overlap sleeves and the shift pressure regulating valve before spending money on a plate.
- Bench the plate last, not first.
One step people skip: if the unit is reconditioned or replaced, the service information requires the TCM adaptation procedure be run with a scan tool. A 722 that shifts badly right after a repair is often just running on the old learned values.
What actually prevents it
Fluid and heat, in that order. Working pressure on a 722 is modulated against engine load rather than run at a flat number, so every wear failure above is ultimately a pressure failure. Oxidized or wrong-viscosity fluid accelerates bore wear, and bore wear produces the flare that produces the code that produces the shutdown. Service it on schedule with a fluid that matches the correct MB sheet number, replace the filter and pan gasket rather than just draining, and fix cooler flow problems instead of living with them.
Conductor plates, valve body kits, 13-pin connector sleeves, filter and pan gasket sets, rebuild kits and ATF fill tooling for the 722.6 and 722.9 — shipped from the USA.
Shop 722.x Mercedes parts →Sources
- Chrysler / Mercedes NAG1 (722.6) Service Information, Section 21 — Automatic Transmission. Backs the emergency running function: on a critical fault the TCM de-energizes all solenoid and regulating valves, the last engaged gear remains engaged, modulating and shift pressures rise to maximum, and the converter lockup clutch is deactivated; the stop / engine off / P / wait 10 seconds / restart procedure that returns D as 2nd gear and R as reverse; the limp-home function staying active until the DTC is rectified or erased; gear ratios 3.59, 2.19, 1.41, 1.00, 0.83 with 3.16 reverse and a 1.93 reverse-in-limp; input speed sensor N2 reading the front sun gear via the externally toothed K1 disc carrier and N3 reading the front planet carrier via the internally toothed K1 disc carrier, spring-loaded to a defined gap against the exciter ring; the 13-pin bayonet plug connector and the O-ring inspection for a leak at the control unit electrical connector; the engine-running fluid level check with scan tool temperature and dipstick 9336; the fluid contamination list and the coolant-in-fluid radiator replacement; and the required TCM adaptation procedure after reconditioning or replacement. w124performance.com (OEM service manual PDF)
- Sonnax — "Mercedes 722.6, Daimler W5, Porsche W5, Jaguar 722.6," Mio Cundl, Sonnax TASC Force, June 30, 2009. Backs the working pressure regulator valve mechanism: the outer bore wears and lets pMod solenoid signal oil leak past the boost end of the valve, working pressure stops rising with engine load, and flare or loss of gear results; the 1998 warranty experience in which high-mileage cars had a 2-3 flare causing the vehicle to go into limp mode; the one-piece valve loading both the large and small inboard ends of the bore; and the 1-2/4-5, 2-3 and 3-4 overlap sleeves in the pMod signal circuit wearing on the I.D. and leaking at the O.D., reducing pressure at the working pressure valve. sonnax.com
- Sonnax — "Mercedes 722.6/Chrysler NAG 1 Vacuum Test Guide," December 30, 2013. Backs the vacuum test locations and the parts tied to each complaint: pressure regulator valve (low line pressure, no 2-3, 4-3 neutral, soft shifts under acceleration, slip codes, delayed engagement, no lockup) corrected with 68942-07K or sleeve 68942-06; regulating valve pressure control (delayed engagement, low line rise and long shift duration, shift codes) corrected with 68942-17K; shift pressure regulating valve on the B2 circuit (shift concerns in all forward gears, shift codes, burnt B2 brake, slipping 1st/2nd/3rd); overlap control kits 68942-19K, 68942-27K and 68942-31K; testing valves in rest position; a low vacuum reading indicating wear; and the reamer fixture plus VB-FIX tooling requirement. sonnax.com
- Sonnax — "Oversized Supply Pressure Regulator Valve, Part No. 88740-02" (Mercedes 722.9). Backs the 722.9 supply pressure regulator functioning like the solenoid pressure regulators in Ford units, bore wear in either or both locations allowing fluid loss that prevents proper regulation of solenoid supply pressure, and the resulting harsh or soft shifts, solenoid performance codes, wrong gear starts, TCC apply issues and clutch failure; plus the companion oversized working pressure regulator valve 88740-01 listed for burnt clutches, erratic line pressure, low converter and lube flow, and overheating, and flagged on the 722.9 valve body layout as no longer in production. sonnax.com
- GEARS Magazine (ATRA) — "Nag 1/722.6 P0741 TCC Slip," Rob Faucett, December 2, 2020. Backs the converter clutch slipping between 5% and 95% when engaged depending on vehicle speed and engine load; the four TCC status modes (open, open-slip, slip, slip-open) and the module only comparing actual to desired slip during slip mode; P0741 setting when slip exceeds 60 rpm in slip mode three times in one key cycle; normal engine load of roughly 10 to 20 percent at idle rising to 90 to 100 percent at WOT in gear; and back-probing the solenoid command wire to compare actual duty cycle against the scan tool value to separate a module power, ground or internal fault from a transmission fault. gearsmagazine.com
- Mercedes-Benz Group — Operating Fluids, Sheet 236.14 (and Sheet 236.12). Backs the MB approval sheet numbers referenced for 722 fluid: 236.14 (ATF 134) for 722.9 units through mid-2010, with 236.12 among the earlier red ATF specifications for the 722.6, and the approved-product list per sheet being the authority on whether a given fluid is actually approved. operatingfluids.mercedes-benz.com