A customer rolls in with a mid-2000s Mercedes -- an E-Class, a C-Class, an ML, maybe an S-Class -- and the complaint is always some version of the same thing: "It won't shift, the RPMs shoot up, and it feels stuck." The car starts moving in what feels like second gear, the check engine light is on, and top speed is limited to around 30 MPH with the tach climbing past 4,000 RPM. Nine times out of ten on the 722.6, you are not looking at worn clutches or a bad pump. You are looking at a failed conductor plate.
The 722.6 -- Mercedes internal name for the five-speed automatic, also badged NAG1 in Chrysler and Dodge applications and used in everything from the Sprinter van to the Porsche 996 and supercharged Jaguars (Sonnax notes the unit has been in production since 1996 and that in the W5A series the last three digits indicate the maximum input torque in Newton meters, so a W5A580 is rated 580 Nm) -- is a mechanically robust transmission. It routinely goes 200,000-plus miles on the hard parts. What lets it down is a single electronic component buried under the pan, and the good news for shop owners and DIYers is that it is one of the more repairable failures in the automatic transmission world. You do not pull the transmission. You do not even fully disassemble the valve body. Here is how to confirm it and fix it right the first time.

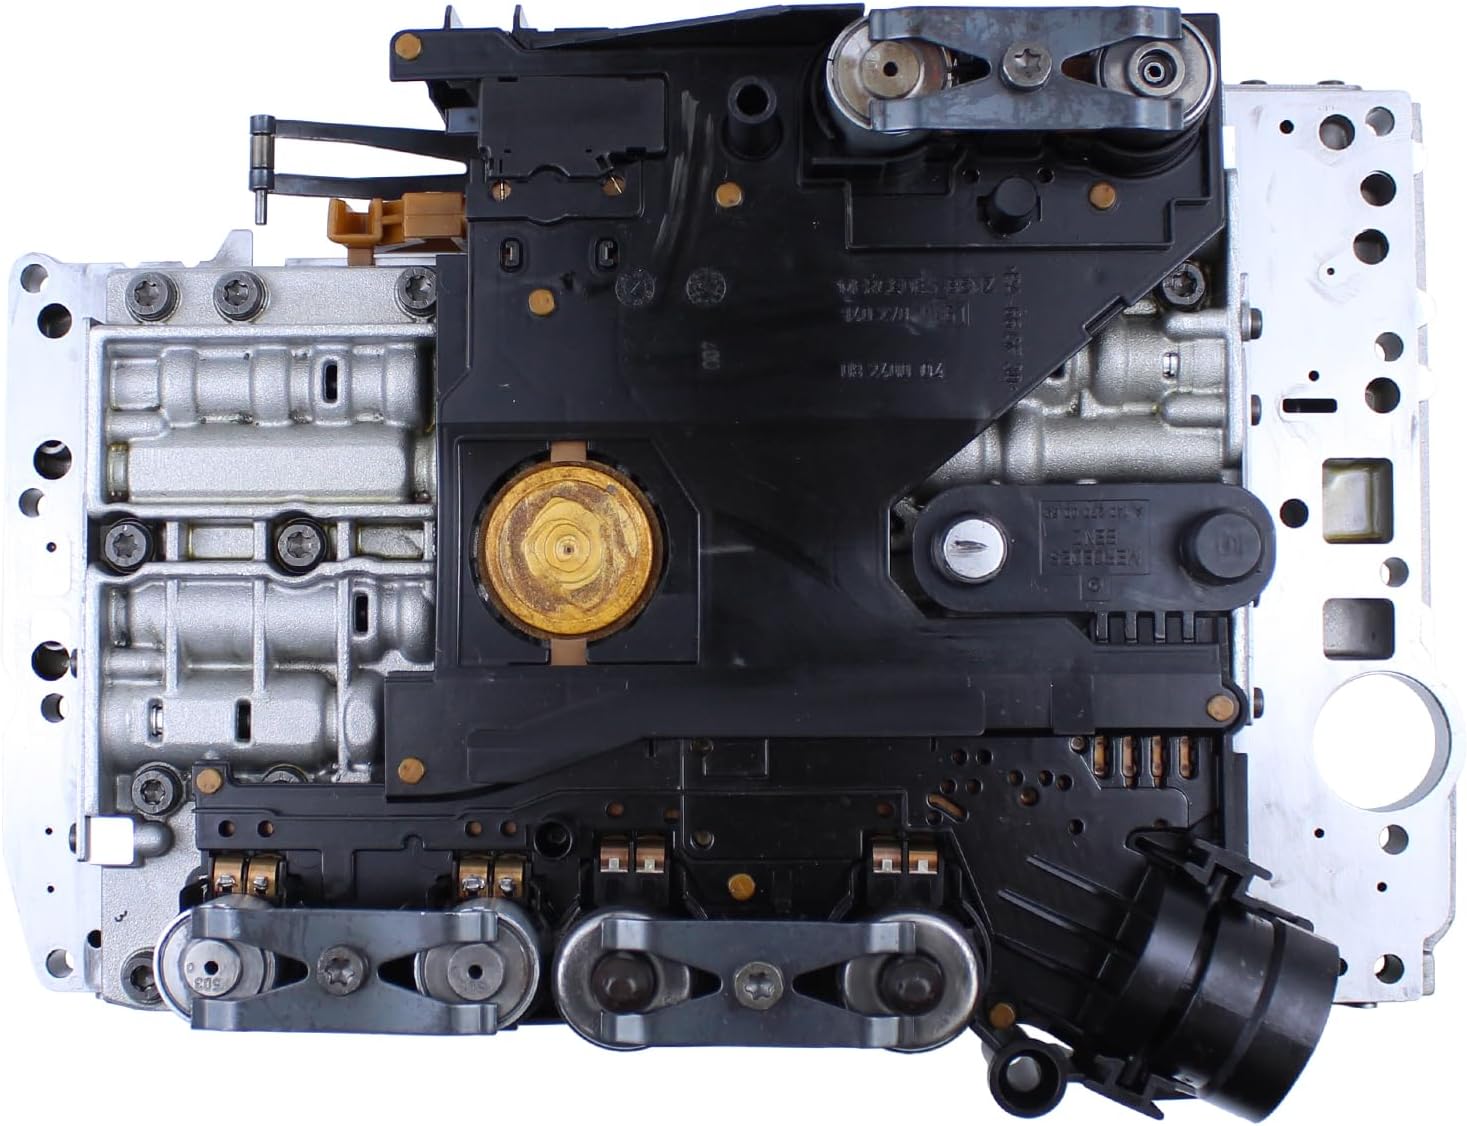

What the Conductor Plate Actually Is
The conductor plate sits on top of the valve body, inside the transmission pan. It is a flat electrical carrier -- think of it as a flexible printed circuit board with integrated speed sensors -- that does three jobs at once. First, it carries the electrical signals between the transmission control module (the electronic transmission controller, or ETC/TCM, bolted to the 13-pin connector) and the six shift solenoids on the valve body. Second, it houses the transmission's internal speed sensors, the N2 and N3 sensors, which the controller uses to read input and intermediate shaft speed. Third, it routes the temperature sensor signal.
That is a lot of responsibility for a part sitting in a bath of hot transmission fluid with delicate soldered contacts. Over time, heat cycling degrades those contacts and the internal traces, and the speed sensors start dropping out or reading erratically. When the controller loses a reliable input speed signal, it cannot verify gear ratios during a shift, so it does the safe thing: it commands limp mode -- typically a fixed second gear -- to get the car home without grenading anything. The Autopian's teardown of the part put it plainly: the conductor plate contains delicate electrical contacts that degrade over time, and when they fail the car drops into limp-home mode stuck in second gear.
The Codes You Will Actually See
Pull codes from the transmission controller, not just the generic powertrain module. The 722.6 stores its useful data in the ETC/TCM, and a cheap generic reader that only sees P-codes from the engine ECU will often miss the specifics. The classic conductor plate signature is a combination of these:
- P0715 -- Input/Turbine Speed Sensor Circuit Malfunction. This is the N2/N3 speed sensor in the conductor plate. It is the single most common conductor plate code on the 722.6.
- P0720 -- Output Speed Sensor Circuit Malfunction. Related speed-signal fault; can also point at the output sensor but frequently rides along with conductor plate degradation.
- P0705 -- Transmission Range Sensor circuit (range/performance). On these cars the range signal path runs through the same connector and conductor plate ecosystem, so a failing plate or a corroded 13-pin connector can throw it.
- P0700 -- Generic "transmission control system malfunction." This is the umbrella flag the engine ECU sets when the transmission controller reports a fault. It tells you to go read the TCM, nothing more.
If you see P0715 with a limp-mode-in-second complaint, the conductor plate is your prime suspect before you touch anything else. But confirm before you condemn -- because there is a cheaper part that mimics all of this.
OTC 5610 Transmission & Engine Oil Pressure Tester Kit
Before you condemn a conductor plate on a shift complaint, rule out a hydraulic pressure problem. This kit lets you tap the 722.6 line pressure port and confirm the pump and regulator are healthy, so you are not chasing an electrical part when the real issue is low apply pressure. A pressure test is the fastest way to separate an electrical fault from a mechanical one.
View in the Gearbox Insider Store →Check the 13-Pin Connector First -- It Is a $20 Problem
Before you buy a conductor plate, look at the 13-pin connector on the driver's side of the case. This round bayonet connector is where the external transmission harness plugs into the transmission, and it is one of the most notorious leak points on the 722.6. The internal O-ring and the connector's adapter sleeve harden and shrink with age. Once they leak, fluid does not just drip on the floor -- it wicks up the wiring harness and travels inside the insulation all the way to the transmission control module, where it corrodes contacts and creates exactly the same intermittent speed-sensor faults a bad conductor plate produces.
Symptoms of a leaking connector: a persistent reddish weep at the connector body, low fluid level, intermittent limp mode that comes and goes with temperature, and -- the tell -- fluid visible inside the harness plug when you unplug it. The fix is a new connector adapter and O-ring kit, which runs under $20 in parts. Replace it, clean and dry the harness, top off with the correct fluid, clear codes, and road test. A meaningful percentage of "conductor plate" cars are fixed right here for the price of a seal kit. If the codes return after a clean connector repair, then move to the plate.
One caution that shows up on the forums repeatedly: if you disturb or replace the 13-pin connector and reassemble it with a bent pin or a partially seated bayonet, you can push a healthy transmission straight into limp mode because a solenoid supply pin lost its 12V feed. Seat it fully, verify the pins are straight, and do not force the bayonet.
Replacing the Conductor Plate: Step by Step
This is an under-car job. The valve body drops out the bottom with the pan; the transmission stays in the car. Budget a half to a full day the first time, less once you have done a few. Cleanliness is everything -- any grit that gets onto the valve body separator plate or solenoid screens will cause new problems.
1. Drain and drop the pan
Get the transmission to a manageable temperature, place a catch pan, and remove the drain plug with a 5mm Allen socket. Drain the fluid, then remove the pan bolts and lower the pan. Expect roughly 3.5 to 4 liters from a pan-only drain; the full 722.6 system holds on the order of 8 to 12 liters depending on year and torque converter, so a pan service is a partial fluid change, not a complete flush.
2. Remove the valve body
Unplug the internal harness, then remove the T30 Torx bolts holding the valve body assembly to the case. Loosen them in a zig-zag/criss-cross pattern so the valve body comes down evenly, and support it as the last bolts come out. Lower it to a clean bench. Keep it flat -- do not let the separator plate shift.
3. Swap the plate on the bench
On the bench, remove the yellow plastic solenoid covers. Underneath are six solenoids retained by three brackets; remove the T30 bracket bolts and pull the solenoids straight out, keeping track of their positions. The conductor plate is held to the valve body by plastic tabs -- lift it until the tabs release, then remove it. Install the new plate, reseat the solenoids in their original locations, and reinstall the brackets and covers.
4. Reinstall and torque
Refit the valve body to the case and torque the T30 bolts evenly in a criss-cross pattern. Reinstall the pan with a fresh filter and gasket. Typical published torque values for this family are about 8 Nm (roughly 71 in-lb) on the pan bolts and about 20 Nm on the drain plug -- always confirm against the year-specific service data for the car in front of you.
5. Fill, then set the level hot
Add fluid through the fill tube, start with an initial fill of a few liters, and set the final level by temperature using the dipstick tube and the correct MB procedure -- the 722.6 has no simple "park on level ground and read cold" check. The level must be verified at a specified fluid temperature. Overfilling causes aeration and foaming; underfilling starves the pump on hills.
Lisle 18232 Offset Funnel with Cap and Lid
The 722.6 fill tube is in an awkward spot and the fluid goes in from underneath the car. An offset funnel with a cap lets you fill cleanly without spilling MB 236.14 down the bellhousing. A small tool, but it makes the fill and hot-level-set step far less messy on these transmissions.
View in the Gearbox Insider Store →One ordering trap before you buy anything. If the repair escalates from the conductor plate to a replacement valve body, the casting number alone will not get you the right part. Sonnax's 722.6 valve body identification guide lists the Mercedes castings as 02 06, 04 06, 05 06, 06 06 and 00 06, with Jaguar also using 00 06, and states plainly that while the casting number is the same, these are not the same valve bodies. Chrysler NAG1 units are a separate part again. Match the application, not just the number stamped near the linkage.
Do Not Skip the Adaptation Reset
This is where careful jobs go sideways. The 722.6 controller stores learned shift-adaptation values -- pressures and timing it has adjusted over the life of the old, degrading plate. After you install a new conductor plate you must clear the fault codes and reset/recalibrate the transmission adaptations with a capable scan tool. Most 722.6 replacement plates come pre-programmed and do not require variant coding, but the adaptation reset is not optional. As the workshop guidance bluntly puts it: if you replace the conductor plate and do not perform the adaptation, the car may not even move properly.
After the reset, drive the car through a deliberate relearn: light-to-moderate throttle, let it cycle up and down through all five gears several times, allow it to reach full operating temperature, and confirm smooth, correctly-timed shifts. If you have access to live data, watch the N2/N3 speed signals during the road test -- they should track cleanly with no dropouts, which is the direct confirmation your new plate is doing its job. For a refresher on reading these signals, see our guide on how to read transmission live data.
Use the Right Fluid -- MB 236.14
The 722.6 is fluid-sensitive. The correct specification is MB 236.14 (the current 236.14 fluid, sometimes called ATF 134/4134, is backward compatible with the earlier 236.10 and 236.12 approvals used on these transmissions). Fuchs Titan ATF 4134 is a widely used approved analog carrying the MB 236.14 approval. Using a generic multi-vehicle ATF that does not carry a Mercedes 236-series approval changes the friction characteristics and can produce shudder and harsh shifts that mimic a mechanical failure. Do not economize on the fluid in a transmission whose entire reputation rests on being left alone with the right lubricant.
If you are sourcing the conductor plate, 13-pin connector adapter kit, filter, pan gasket, and the correct 236.14 fluid together, OEM-grade Mercedes transmission parts are worth using here. Our sister store gearboxinsider.com stocks solenoids, sensors, seal kits, filters, and fluids for jobs like this so you are not mixing questionable-quality electronics into an otherwise clean repair.
When It Is Not the Conductor Plate
The most useful differential here is flare, not limp mode. Sonnax's 722.6 technical writeup pins engine RPM flare on the 2-3 and 4-5 upshifts, or a neutral flare on the 5-4 and 3-2 downshifts, on the outer bore of the working pressure regulator valve wearing and allowing pMod solenoid signal oil to leak past. That is hydraulic bore wear, not an electrical fault, and no conductor plate fixes it. If the complaint is flare rather than a hard limp-mode lockout with speed-sensor codes, vacuum-test the valve body bores before you spend money on electronics — Sonnax publishes a 722.6 / NAG 1 vacuum test guide that gives you a pass/fail per bore.
Confirm before you condemn. A few failures wear the conductor plate's clothing:
- Leaking 13-pin connector -- covered above; always the first check. A $20 fix that saves a $200 part.
- Low fluid / wrong fluid -- an overdue or mis-specced fluid change causes shudder and lazy shifts. Verify level hot and confirm 236.14 was used.
- Valve body wear -- worn torque converter control valves and separator plate wear cause slip and converter shudder that no electronic part will fix. If pressure testing shows a hydraulic problem, the plate is not your answer.
- Actual N2/N3 sensor vs. trace failure -- both live on the plate, so the repair is the same, but knowing which one dropped out helps you interpret the live data during the relearn.
The discipline is the same as any transmission diagnosis: read the transmission controller codes, check the cheap and common failure first, pressure test to separate electrical from hydraulic, and only then commit to the internal repair. The 722.6 rewards that discipline -- get it right and these transmissions go another 100,000 miles without complaint.
Need parts for this job?
Rebuild kits, hard parts, solenoids, valve bodies, filters, gaskets and the correct fluid for this unit — shipped fast from the USA on secure checkout.
Shop 722.x Mercedes parts →Sources
- Sonnax — Mercedes 722.6, Daimler W5, Porsche W5, Jaguar 722.6 — Backs the unit background and the flare diagnosis: production since 1996 across Mercedes, Porsche and Jaguar plus the Chrysler NAG1 designation, the W5A naming convention in which the last three digits indicate maximum input torque in Newton meters, and the wear mechanism behind RPM flare on 2-3 / 4-5 upshifts and neutral flare on 5-4 / 3-2 downshifts — the outer bore of the working pressure regulator valve wearing and letting pMod solenoid signal oil leak past. https://www.sonnax.com/tech_resources/129-mercedes-722-6-daimler-w5-porsche-w5-jaguar-722-6
- Sonnax — 722.6 Valve Body Identification — Backs the parts-ordering warning: the Mercedes castings 02 06, 04 06, 05 06, 06 06 and 00 06, Jaguar sharing the 00 06 casting, the separate Chrysler NAG1 unit, the casting location near the linkage, and the explicit note that while the casting number is the same, these are not the same valve bodies. https://www.sonnax.com/tech_resources/347-722-6-valve-body-identification
- Sonnax — Mercedes 722.6 / Chrysler NAG 1 Vacuum Test Guide — Backs the recommendation to vacuum-test the valve body bores to separate hydraulic wear from an electrical conductor plate failure before replacing parts. https://www.sonnax.com/tech_resources/412-mercedes-722-6-chrysler-nag-1-vacuum-test-guide
- Sonnax — Mercedes 722.6 Valve Body Layout — Reference diagram of the 722.6 valve body used to locate the regulator, solenoid and pressure circuits discussed above. https://www.sonnax.com/tech_resources/600-mercedes-722-6-valve-body-layout
- Sonnax — 722.6 Solenoid Identification — Reference for identifying the 722.6 solenoids and connector pin-out when a solenoid is suspected instead of the conductor plate. https://www.sonnax.com/tech_resources/279-722-6-solenoid-identification
- FUCHS — TITAN ATF 4134 (MB-Approval 236.14) — Backs the fluid specification called for in this article: the fluid maker's own product listing for the ATF carrying Mercedes-Benz approval 236.14, which is the spec that goes back into a 722.6 after a conductor plate and filter job. https://www.fuchs.com/us/en/product/product/11162-TITAN-ATF-4134/