

Cooler lines are the least glamorous parts on a 200-4R and one of the most common reasons a good unit comes back. By now most of these transmissions are sitting in G-bodies, B-bodies and Buick turbo cars that are 35 to 45 years old, and the original steel lines have spent that whole time collecting road salt behind the radiator support and next to the exhaust. When a line pinholes, kinks, or gets hacked together with a compression union and a piece of fuel hose, the converter loses its heat exit and the geartrain loses part of its lube supply. Here is how the circuit works, how to tell a line is the problem, and how to replace one so it does not cost you the transmission you just paid for.
What the cooler lines actually do on a 200-4R
Fluid leaving the torque converter is the hottest fluid in the transmission, and the cooler circuit is where that heat goes. On the 200-4R the converter-out oil leaves the case through one fitting, runs forward to the cooler tank inside the radiator side tank, gives up heat to the engine coolant, and comes back through the second line. Like the rest of the THM family, the returning oil feeds the lube passages for the bushings, thrust washers and planetary gearsets. That is why a restricted line hurts twice: the converter runs hotter, and the parts downstream run on less oil.
The converter clutch circuit sits in the same path. Sonnax lists its 77805-K TCC apply valve kit for the 200-4R to correct a worn apply valve bore that lets converter signal and converter feed oil cross-leak (Sonnax 200-4R unit listing). Sonnax's own kit description goes further: a cross-leaking valve can float to a mid-position and restrict cooler flow, which burns the converter. So if you find low cooler flow on a unit with lockup complaints, do not assume the lines are the only suspect. Fix the lines, then flow-check again before you blame the valve body.
Signs a 200-4R cooler line needs replacing
- Wet residue or drips at the case fittings or the radiator fittings. Red or brown film on the passenger side of the case, on the crossmember, or down the radiator tank. Clean it and recheck after a drive so you know which joint is weeping.
- Scaled, pitted or swollen steel. Scrape the tube with a pick where it runs under the clips. If the wall flakes or the pick catches a pit, the line is done. Patching one rotten spot just moves the leak a foot down the tube.
- Kinks and flats. Lines that were pried on during an engine or radiator swap often get flattened right at the bend. A tube that is visibly oval has lost flow area you cannot see from the outside.
- Old rubber splices. A previous owner's short section of hose clamped over the steel is a ticking clock if the hose is not rated for ATF and line heat (more on that below).
Check flow before and after the job
GM's dealer procedure for this check uses the J-45096 TransFlow machine. GM bulletin 17-NA-066 calls it an essential tool for diagnosing transmissions that may have overheated or run short of lubrication, and says that when measured flow is under the minimum, additional repairs are likely needed to fix the restriction, naming cooler replacement and line replacement specifically, followed by a second flow test to validate the repair. GM dropped the mandatory test on every transmission repair as of December 1, 2018, but it remains the way GM proves a cooling circuit is clear.
The minimum flow GM expects depends on fluid temperature and cooler material. In GM's published flush and flow procedure, you identify a steel versus aluminum cooler with a magnet at the cooler flange on the radiator, then look up the minimum. For scale, that table calls for about 0.8 GPM through a steel cooler and 0.7 GPM through an aluminum one with 71 to 75 degree F fluid. That table was written for later front-drive units, so treat it as a sanity check on a 200-4R, not a spec.
Without a TransFlow machine, the shop-floor version is simple. Disconnect the return line at the case (or the line coming back out of the radiator), aim it into a marked container, and run the engine at idle in Park for a short, timed burst while a helper watches the level. You want a strong, steady stream, not a sputter or a trickle. Do not run it long enough to pull the pan level down; the pump should never run dry. Do it before the job for a baseline and again afterward.
Parts and materials that are right for this job
Steel line
Measure the old tube outside diameter with calipers before you buy anything. Match the OD and wall, and match the flare at each end: the radiator side and the case connector side both use flare nuts, and the flare type on your replacement has to match the seat it is going into. A wrong flare angle will seal on the first start and weep after the first heat cycle. If pre-bent lines are not available for your chassis, use straight tubing, a real bender and a flaring tool sized for your tube.
Case fittings
The connectors that screw into the 200-4R case are their own part, separate from the lines. GM used both tapered pipe thread (NPT) and straight thread (NPSM) cooler ports across its transmissions, and the straight-thread style seals on the fitting seat or a washer, not on the threads. Identify which one you have before you put sealant on anything. Never wrap a straight-thread fitting with tape and crank it down to stop a leak; you will crack the case boss before the leak stops. If the old connector's flare seat is chewed up or the hex is rounded, replace the connector rather than reusing it.
Rubber hose sections
If any part of the run is hose, it has to be transmission oil cooler hose. SAE J1532 is the standard for it. The 1995 revision lists Type A and Type B hose for -40 to 125 C (257 F) service and higher-temperature AT and BT types to 150 C (302 F), with a recommended maximum operating pressure of 1.7 MPa (250 psi) for Types A and AT and 1.0 MPa (150 psi) for Types B and BT. The lower-pressure B types are for auxiliary cooler use only. Use Type A or AT hose for any section of the main lines, never fuel or heater hose, and clamp it over a beaded or barbed tube end.
Braided AN conversions
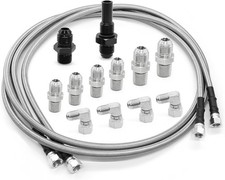
Many swaps and turbo-car builds go to -6AN braided PTFE lines with adapters at the case. That works well as long as the adapters match your case threads and every line is supported away from the exhaust.
200-4R 6AN Braided PTFE Cooler Line Kit at CoreTransmissionParts
If you are replacing the whole run rather than one rotten section, this 70-inch stainless braided PTFE kit is built for the 200-4R and gets rid of the rusted steel and rubber splices in one job.
View the 200-4R braided cooler line kit →Step by step: replacing 200-4R cooler lines
- Get a baseline. Note the fluid level and condition, and do the flow check above if the lines are still intact enough to run.
- Raise and support the car properly and put a drain pan under both the case fittings and the radiator. Each line holds some fluid and the radiator tank will drain back through it.
- Break the flare nuts loose with flare-nut (line) wrenches. Hold the case connector or the radiator fitting with a second wrench so you are not twisting the connector in the case or the fitting off the radiator tank. If a nut is rusted to the tube, cut the tube and use a six-point socket on the nut rather than rounding it.
- Remove the lines with their clips and isolators and keep them as your bending template. Clean the flare seats on the case connectors and radiator fittings.
- Bend and flare the new lines to match the old ones. Slide the flare nuts on before you flare. Keep the same clearance from the exhaust, the crossmember and the oil pan the factory had, or more.
- Flush the cooler before you connect anything (next section). This is not optional after a failure.
- Install the lines finger-tight at both ends first, then tighten each flare nut while holding the fitting. A flare seals on the seat; once the nut is firmly seated, more force only distorts the flare.
- Reinstall every clip and rubber isolator. An unsupported line vibrates and work-hardens at the flare until it cracks.
- Refill, run and recheck. Start the engine, cycle through the gears, top up, then check for leaks at all four joints with the fluid hot.
Do not skip the cooler flush
New lines bolted to a dirty cooler is the classic comeback. Transmission Digest's "To Flush or Not to Flush" (Pat Barrow, Lubegard) points out that contaminated coolers, usually mounted in the bottom of the engine radiator, are often the cause of premature failure in replacement transmissions, because the old fluid, clutch material and metal from the failed unit were never purged. The same article notes that after a catastrophic failure it may not be possible to clean the cooler completely, and some transmission suppliers require a new radiator or cooler to keep the warranty.
GM's own flush procedure back-flushes first, then forward-flushes, then flow-tests, and if flow is still below the minimum after a second round, the cooler gets replaced. GM bulletin 17-NA-066 adds that if the flush fluid is different from the fluid going in the transmission, you blow the residual fluid out of the cooler and lines with compressed air afterward. After a metal-in-the-pan failure, budget for a new cooler; after a solenoid or clutch failure, a thorough two-direction flush is usually enough.
Fluid and refill
The 200-4R was designed in the DEXRON-II era. Valvoline's DEXRON-VI product information sheet states the fluid is GM licensed and back-serviceable wherever DEXRON-II or DEXRON-III was originally specified, so DEXRON-VI is the correct modern fill. The lines and cooler drain when you take them apart, so expect to add fluid after the first start. Set the final level with the fluid at operating temperature, on level ground, in Park with the engine running. Do not overfill; foamed fluid pushed out the vent looks a lot like a cooler leak.
Mistakes that cost transmissions
- Compression unions or fuel hose as a "fix." Neither is built for ATF at line pressure and temperature; both weep or let go with heat cycling.
- Swapping feed and return. Mark both ports before you pull the old lines, especially on swaps with an auxiliary cooler.
- Skipping the second flow check. GM requires one after cooler or line repairs on the units its bulletin covers; it is the only proof the restriction is gone.
Need parts for this job?
Coolers, cooler flush, flaring tools and the rest of the 200-4R catalog, shipped from the USA with secure checkout.
Shop 200-4R parts →FAQ
How do I know which 200-4R cooler line is the return?
Do not guess from a picture, because swaps and previous repairs move lines around. Disconnect one line at the radiator, point it into a container and bump the engine at idle in Park; the line that pushes fluid is the feed from the transmission to the cooler, and the other is the return that comes back to the case and feeds the lube circuit. Mark both before you pull the old lines.
Can I use rubber hose to repair a rusted 200-4R cooler line?
Only hose made for the job. SAE J1532 is the standard for transmission oil cooler hose, and its Type A and AT hose is rated to a recommended 1.7 MPa (250 psi), while Type B and BT is rated to 1.0 MPa (150 psi) and intended for auxiliary coolers only. Use Type A or AT for the main lines, never fuel or heater hose, and clamp it over a beaded or barbed tube end.
Do I need to flush the cooler when I replace the lines?
Yes, if the transmission has failed or the fluid is contaminated. Transmission Digest notes that contaminated coolers are often the cause of premature failure in replacement transmissions, and GM's procedure back-flushes, forward-flushes and then flow-tests the cooler. If the old unit came apart and filled the pan with metal, plan on replacing the cooler or radiator instead.
How much flow should a 200-4R cooler circuit have?
There is no published 200-4R TransFlow number, so treat later GM data as a sanity check. GM's flush and flow procedure calls for roughly 0.7 to 0.8 GPM minimum through aluminum and steel coolers with room-temperature fluid, and bulletin 17-NA-066 says the TransFlow machine tops out around 2 GPM. In the shop, look for a strong, steady stream from the return line at idle, and recheck after the repair.
What fluid goes back in after replacing 200-4R cooler lines?
DEXRON-VI. Valvoline's product information sheet states it is GM licensed and back-serviceable wherever DEXRON-II or DEXRON-III was specified, which covers the 200-4R. Expect to top up after the first start because the lines and cooler drain during the job, and set the final level hot, in Park, with the engine running.
Related guides
- 200-4R fluid leak: common spots
- 200-4R overheating prevention
- 200-4R towing upgrades and cooling
- 200-4R flush vs drain-and-fill
- 200-4R torque converter shudder
Shop the part for this fix
Full 200-4R catalog at CoreTransmissionParts: cooler line kits, AN adapter fittings, filters and hard parts.
Shop 200-4R parts at CoreTransmissionParts →Sources
- GM Service Bulletin 17-NA-066, "Automatic Transmission Oil Cooler Flush and Flow Test" (December 2018, hosted by NHTSA) — backs the J-45096 TransFlow as GM's tool for diagnosing overheating or lack of lubrication, low flow requiring cooler or line replacement plus a second flow test, the roughly 2 GPM calibration and 2.5 GPM fault threshold, compressed-air purge when flush fluid differs, and the end of the mandatory flush and flow test on December 1, 2018. static.nhtsa.gov (PDF)
- GM service information, "Transmission Fluid Cooler Flushing and Flow Test" — backs the magnet test for steel versus aluminum coolers, the temperature-based minimum flow table (about 0.8 GPM steel and 0.7 GPM aluminum at 71 to 75 F), the back-flush, forward-flush and flow-test sequence, and replacing the cooler when flow stays low. saabwisonline.com
- SAE International, J1532 "Transmission Oil Cooler Hose" (1995 revision) — backs the Type A/B and AT/BT temperature ranges (125 C and 150 C) and the 1.7 MPa (250 psi) versus 1.0 MPa (150 psi) recommended maximum pressures, with B types for auxiliary coolers only. The current June 2021 revision keeps Type A for OE and replacement use and Type B for aftermarket auxiliary coolers. saemobilus.sae.org
- Transmission Digest, "To Flush or Not to Flush" by Pat Barrow (Lubegard), June 2019 — backs that contaminated radiator-mounted coolers often cause premature failure of replacement transmissions, that a catastrophic failure may leave a cooler impossible to clean, and that some suppliers require a new cooler for warranty. transmissiondigest.com
- Sonnax, GM 200-4R unit listing — backs the 77805-K TCC apply valve kit for a worn apply valve bore that lets converter signal and converter feed oil cross-leak on the 200-4R. sonnax.com/units/437-200-4r
- Valvoline, DEXRON-VI ATF product information sheet — backs that DEXRON-VI is GM licensed and back-serviceable where DEXRON-II or DEXRON-III was originally specified. Valvoline DEXRON-VI PI sheet (PDF)