The 4L85E is the heavy-duty version of the 4L80E — a five-pinion, six-clutch four-speed that GM put behind big-blocks, 8.1L gas trucks, and the heaviest 2500/3500 and van applications. It shares its valve body family with the 4L80E and TH400 before it, which is good news and bad news. Good, because parts and specs are well documented. Bad, because the same valve body wear patterns that plague the 4L80E show up on the 4L85E too — and when they do, they can spike line pressure high enough to crack the case or break a clutch piston.
This is a rebuilder's walk through the 4L85E valve body: what it does, the symptoms of a worn one, the specific valves that cause them, a numbered procedure to actually test it before you condemn anything, and when a repair kit makes sense versus a replacement valve body.
The short version: Most 4L85E valve body complaints trace back to a few worn bores — the boost valve and pressure regulator, the accumulator control valve, and the actuator feed limit (AFL) valve. A worn boost valve is the dangerous one: it causes either soft shifts and burnt clutches (low boost) or runaway line pressure that breaks hard parts (high boost). Confirm it with a line-pressure gauge and a vacuum test before you buy anything. Per Sonnax, these units can climb to 500–600 psi when the boost circuit cross-leaks.
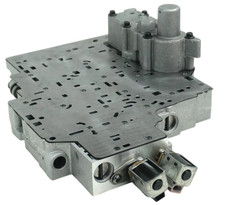
What the 4L85E Valve Body Actually Controls
The valve body is the hydraulic brain of the transmission. It takes pump pressure and, using the pressure regulator and boost valve assembly, sets line pressure — the base pressure that applies every clutch and band. From there, shift valves route that pressure to the right apply circuit at the right time, accumulator valves cushion the apply so shifts are firm but not harsh, and the actuator feed limit valve feeds a clean, regulated supply to the shift solenoids.
On the 4L85E, line pressure is not fixed. The PCM commands the EPC (electronic pressure control) solenoid, which leans on the pressure regulator and boost valve to raise pressure under load and back it off at light throttle. A stock unit runs roughly 60 psi at minimum up to around 170 psi at full command. When a valve in that chain wears, the pressure the computer commands and the pressure the clutches see stop matching — and that mismatch is the root of nearly every valve body complaint below.
Symptoms of a Bad 4L85E Valve Body
Valve body wear rarely announces itself as one clean symptom. It shows up as a cluster. The most common 4L85E and 4L80E complaints are soft 2-3 shifts, harsh shifts, no upshift, burnt direct clutch, broken hard parts from high pressure, and low pressure that sets gear-ratio and solenoid-performance codes. Match your complaint to the list:
- Soft or slipping 2-3 shift, burnt direct clutch. The classic low-boost signature. The clutch doesn't get enough apply pressure, slips, and cooks.
- Runaway line pressure, buzzing, broken case or direct drum. The high-boost signature. Reverse boost oil cross-leaks into the torque signal circuit and pressure climbs out of control.
- Harsh, banging shifts at every gear change, often with a leaking accumulator circuit.
- No reverse, delayed reverse, or reverse slip — can be a checkball/sleeve or boost-circuit issue, not always a clutch.
- Wrong-gear starts, no 4th, band failure, and solenoid performance codes — a worn actuator feed limit valve starves the solenoid feed.
- 2nd-gear starts and no upshifts from broken actuator-feed-limit filters or an AFL end-plug leak.
The reason a single worn valve body throws such a scattered net is that everything downstream depends on stable pressure upstream. That is why you test rather than guess.
The Valves That Actually Cause It
Sonnax's GM 4L80-E, 4L85-E valve body layout maps each symptom to the specific valve bore responsible. These are the four that account for most failures on the bench.
1. The boost valve (the dangerous one)
The boost valve assembly is notorious on this family for wearing in either direction. A worn boost valve sleeve lets reverse boost oil cross-leak into the torque signal circuit; the worn aluminum end/balance plug unbalances the pressure regulator. The result per Sonnax is uncontrollable line rise — upward of 500 to 600 psi — high line pressure in reverse, a buzzing noise, and broken direct clutch drums or cracked cases. The same wear can go the other way and cause low pressure: soft 2-3 shifts, direct clutch failure, and gear-ratio codes. This is the valve to check first because its failure mode can grenade the transmission.
2. The pressure regulator valve
The pressure regulator sets base line pressure. When its bore wears or the balance plug leaks, pressure becomes unstable — contributing to the same high-line, buzz, and broken-parts picture as the boost valve, since the two work as a pair. Sonnax offers an oversized pressure regulator valve specifically to restore a worn bore rather than replace the whole valve body.
3. The accumulator control valve
Accumulators cushion clutch apply. A worn accumulator control valve bore produces soft shifts with low accumulator pressure, or the opposite — high line pressure in Drive and harsh engagement. If your shifts are mushy at light throttle but slam under power, look here.
4. The actuator feed limit (AFL) valve
The AFL valve regulates the feed to the shift solenoids. When it wears, the solenoids get an unstable supply and you get wrong-gear starts, clutch failure, no 4th, band failure, and solenoid performance codes. Broken AFL filters or a leaking AFL end plug cause 2nd-gear starts and no upshifts. It mimics an electrical solenoid fault, so it fools people into buying solenoids that were fine.
How to Test Your 4L85E Valve Body
The order below moves from cheapest and least invasive to most, and it separates a hydraulic (valve body) fault from an electrical (solenoid) or mechanical (clutch/hard-part) one before you spend money. Do it in sequence.
- Pull codes and read them, don't act on them. Note every stored code. Gear-ratio and solenoid-performance codes on this unit are frequently caused by low line pressure from a worn boost valve — not a bad solenoid. Treat the code as a starting point, not a verdict.
- Check the fluid. Dexron-compatible fluid should be red and clean. Dark, burnt fluid with clutch material points to a mechanical failure (burnt direct clutch) that a worn boost valve caused. Clean fluid with a pressure complaint leans hydraulic.
- Hook up a line-pressure gauge to the port on the case. This is the single most important test. Read pressure in Park, Reverse, and Drive, at idle and at a controlled brake-torque or road load. Compare against spec: roughly 60 psi minimum, up to about 170 psi at full command on a stock unit.
- Judge the numbers against the symptom. Pressure that climbs to 300, 400, 500-plus psi — especially high in Reverse — confirms a boost/pressure-regulator cross-leak. Pressure that stays low and won't build under load points to the same valve worn the other way, or a worn pressure regulator bore. Remember the numbers can read in range but arrive at the wrong time; watch when the pressure moves, not just how high.
- Watch commanded vs. actual with a scan tool. Command EPC/line pressure and compare to the gauge. If the computer commands a pressure the transmission never reaches (or wildly overshoots), the electrical side is doing its job and the hydraulic side isn't — that indicts the valve body, not the EPC solenoid.
- Rule out the solenoid electrically. Before condemning a solenoid for a performance code, check its resistance and wiring. A good solenoid with a pressure that won't stabilize means the AFL or boost circuit, not the solenoid.
- Vacuum-test the valve bores. With the valve body off, use a vacuum test plate on the boost, pressure regulator, accumulator, and AFL bores. A bore that won't hold vacuum is worn and leaking — this is the definitive bench confirmation of which valve is bad and whether an oversized/repair valve or a replacement valve body is needed.
- Inspect checkballs, filters, and end plugs. Confirm the reverse and 3rd/4th checkball sleeves are intact, the AFL filters aren't broken, and the end plugs and O-rings seal. These small parts cause big symptoms (no reverse, 2nd-gear starts) and are easy to miss.
Follow that sequence and the 4L85E valve body stops being a mystery: the gauge and the vacuum test tell you which bore is worn, and the scan-tool comparison tells you whether the fault is hydraulic or electrical.
Shop 4L85E valve bodies, boost valve and pressure regulator kits, accumulator and AFL valve kits, shift kits, checkball sleeves, and the tools to install them — shipped fast from the USA.
Shop 4L85E parts →Repair the Bore or Replace the Valve Body?
Once the vacuum test tells you which bore is worn, you have two paths. Both are valid; the right one depends on how many bores are gone and your tooling.
Repair the bore. If one or two bores are worn, a targeted kit is the economical fix. A boost valve kit restores proper clearance with a hardened valve and correctly sized sleeve; an oversized pressure regulator valve reams and restores that bore; accumulator and AFL valve kits do the same for their circuits. A full shift kit (such as the TransGo SHIFT KIT) bundles the common corrections and firms up shift feel at the same time. This is the choice when you have a vacuum test plate and reaming tools and the rest of the body is sound.
Replace the valve body. If multiple bores are worn, the casting is damaged, or you don't have the tooling to ream and fit oversized valves, a remanufactured or new valve body that already has the corrected valves installed is faster and more reliable. It also removes the guesswork — a properly reman'd 4L85E valve body addresses the boost, pressure regulator, accumulator, and AFL wear in one part.
Either way, the diagnosis comes first. Replacing a valve body without confirming why pressure was wrong — and without fixing a burnt clutch or cracked drum that the high pressure already caused — just sets up a repeat failure.
Sources
- Sonnax — GM 4L80-E, 4L85-E Valve Body Layout, the master diagram mapping each symptom to its valve bore (boost valve, pressure regulator, accumulator control, actuator feed limit, checkball sleeves). sonnax.com/tech_resources/805
- Sonnax — Boost Valve Kit 34200-01K, on worn boost valve sleeve reverse-oil cross-leak, uncontrollable line rise to 500–600 psi, high line pressure in reverse, buzz, and broken cases/drums/pistons. sonnax.com/parts/1985-boost-valve-kit
- Sonnax — Oversized Pressure Regulator Valve 77917-07, restoring a worn pressure regulator bore to stabilize line pressure. sonnax.com/parts/2493-oversized-pressure-regulator-valve
- Sonnax — Diagnosing the Elusive No-Reverse With the 4L80-E, on isolating reverse-apply hydraulic faults in the 4L80/4L85 valve body. sonnax.com/tech_resources/88
- ATRA — 4L80E Updates technical bulletin (ATB266), on 4L80E/4L85E line-pressure and shift diagnosis. atracom.blob.core.windows.net/bulletins/1995/allyear/atb266.pdf
- TransGo — 4L80E SHIFT KIT Valve Body Repair Kit, on the common wear complaints (soft 2-3, burnt direct clutch, broken hard parts, low pressure) the kit corrects. transgo.com/product-details/4l80-shift-kit