An E4OD with a worn valve body rarely fails all at once. It starts as a soft 2-3 shift on a hot afternoon, or one harsh 1-2 out of ten, or a reverse that takes a second longer than it used to. Because the E4OD sets every pressure through the computer, those same complaints can also come from a solenoid, a sensor or a wiring fault, and plenty of good clutch packs have been replaced chasing a valve that was hanging in a worn bore.
This guide covers the 1989-97 E4OD in Ford F-Series, Bronco, E-Series and early Super Duty trucks: which symptoms point at which valve, how to clear the electrical side first, what the line pressure gauge should read, how to identify your casting, and how to vacuum test the valve body on the bench. The symptom map and test points are from Sonnax's E4OD/4R100 vacuum test guide, the pressure and connector data are from ATRA's E4OD/4R100 quick reference, and the resistance and torque specs are from the ATSG 4R100 manual. Full list under Sources.
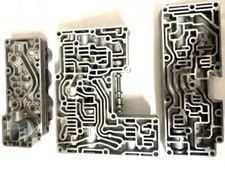
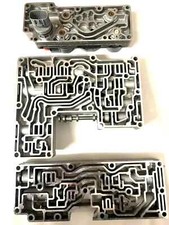
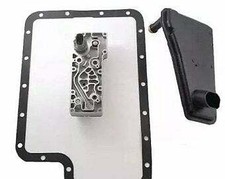
What is on an E4OD valve body
The E4OD valve body is really four pieces stacked together: the upper and lower main control bodies with the separator plate between them, the accumulator body, and the solenoid body that carries the two shift solenoids, the coast clutch solenoid, the TCC solenoid and the EPC solenoid. ATRA's overview describes the E4OD as one of Ford's first transmissions designed from the start for computer control. Two shift solenoids pick the gear and the EPC solenoid sets mainline pressure. There is no throttle valve cable and no governor.
That matters for diagnosis. On an old hydraulic unit a soft shift could be a TV cable. On an E4OD, shift feel is the product of the EPC signal, the line pressure modulator valve that turns that signal into mainline pressure, and the accumulator regulator valves that cushion each clutch apply. Wear in any of those bores changes shift feel even when the computer is doing everything right.
Symptoms and the valve behind each one
Sonnax's vacuum test guide lists the critical wear areas on the E4OD/4R100 and the complaint each one causes. This is the short version, grouped by what the driver actually feels:
| Complaint | Valve to suspect | Casting |
|---|---|---|
| Intermittent harsh shifts, soft 1-2 and 2-3, low line rise, low EPC pressure | Line pressure modulator valve and sleeve | Accumulator body |
| Soft shifts, no 2nd, premature clutch failure | Intermediate clutch accumulator regulator valve | Accumulator body |
| Soft shifts, no 3rd | Direct clutch accumulator regulator valve and plunger | Accumulator body |
| Soft shifts, no 4th | Overdrive clutch accumulator regulator valve and plunger | Accumulator body |
| Harsh 1-2, harsh or soft shifts generally | Accumulator pressure control valve | Accumulator body |
| Delayed reverse, reverse slip, low line pressure in R and manual low | Manual valve bore | Upper main body |
| No engine braking in manual 1, burnt low/reverse clutch | Low/reverse modulator valve, plunger and sleeve | Upper main body |
| Starts in 2nd or 3rd, TCC cycling or slip, low center support lube | Solenoid regulator valve | Upper main body |
| Delayed forward and reverse engagement, burnt forward or direct clutch | Engagement control valve | Lower main body |
| No 2nd, 1-2 shift concerns | 1-2 shift valve | Upper main body |
| 2-3 or 3-4 shift concerns, burnt direct clutch | 2-3 and 3-4 shift valves, 4-3-2 timing valve | Upper main body |
| Burnt coast clutch | Coast clutch shift valve | Upper main body |
Two patterns stand out. A valve body problem is usually tied to one shift or one range, and it is usually worse hot, when thinner fluid leaks faster past a worn bore. A problem that is the same in every gear, hot or cold, is more often electrical or a pump and line pressure issue. The modulator valve is the classic example of the first pattern: Sonnax puts "intermittent harsh shifts" at the top of the complaint list for its 36948-05K line pressure modulator plunger valve kit and blames severe wear of the sleeve, which lets the plunger hang and then free up.
Step 1: Clear the electrical side
Pull codes before anything else. A 1989-95 truck is EEC-IV, so run the key on engine off and continuous memory tests with a code reader. A 1996-97 truck is OBD-II and reads on any scan tool. A throttle position, speed sensor or range sensor fault makes the computer change pressure and shift timing with nothing wrong inside the case.
Then check the solenoids from the case connector. ATRA's chart for the E4OD connector lists terminal F as solenoid power (B+), D and E as shift solenoids 1 and 2, B as the coast clutch solenoid, C as the TCC solenoid ground, and M (B+) and L (-) for the EPC solenoid. ATSG's resistance specs:
| Solenoid | Resistance (ATSG) |
|---|---|
| Shift solenoids 1 and 2 | 20-30 ohms |
| Coast clutch solenoid | 20-30 ohms |
| EPC solenoid | 3.0-5.0 ohms |
ATRA's EPC signal check is to backprobe M and L with the harness connected and watch the signal change as you move the throttle and change ranges. ATSG's code chart gives the two failure modes to keep in mind: an open EPC circuit causes maximum pressure with harsh engagements and shifts, and a shorted one causes minimum pressure. If the solenoids read in spec, the codes are clear and the signal changes like it should, but the truck still misses a shift, you have a hydraulic problem.
Step 2: Put a gauge on it
Tee a gauge that reads at least 300 psi into the line pressure tap on the side of the case. ATRA's drawing shows it near the identification tag. These are ATRA's E4OD/4R100 numbers:
| Range | Idle (psi) | Stall (psi) |
|---|---|---|
| P, N | 50-65 | - |
| R | 70-100 | 245-290 |
| OD, 2 | 50-65 | 165-185 |
| 1 | 70-100 | 175-210 |
Read every range at idle first. ATSG warns not to stall test a unit with low idle pressure, and not to hold wide-open throttle for more than 5 seconds in any range. How to read the results for a valve body complaint:
- Low in one range only. Points at a circuit, not the pump. Low only in R and manual 1 points at the manual valve bore and the low/reverse circuit.
- Normal at idle, won't rise under load. A modulator or boost problem. Sonnax lists low line rise and low EPC pressure for the modulator valve and sleeve.
- Jumps around on a road test. Run the gauge where you can see it from the seat. Pressure that is normal and then spikes, or drops on one shift, is a valve hanging in a worn bore.
- Normal everywhere, but one shift is soft or missing. Line pressure is fine, so look at that clutch's accumulator regulator valve and shift valve.
Step 3: Identify the casting before you order
E4OD valve bodies changed twice, and parts and test points are not the same across years. Sonnax's identification guide uses the casting numbers on the main valve body and the accumulator body:
| Years | Main valve body | Accumulator body | Sonnax reman |
|---|---|---|---|
| 1989 | E9 | E9 | F041 |
| 1990-95 | F0 or F1 | E9 | F040 |
| 1996-98 | F6 | F6 | F042 |
The lower valve body and spacer plate change along with the castings, so a 1996-up spacer plate won't work on a 1990-95 body. Sonnax's vacuum test guide also notes that the worm tracks and test locations on a 1996-98 E4OD are the same as the 4R100, while 1989-95 castings are laid out differently. If you are working from a 4R100 diagram on an early truck, the ports won't line up.
Step 4: Vacuum test the valve body on the bench
A vacuum test is how you find the worn bore without guessing. You need a hand or electric vacuum pump with a gauge and a rubber tip that seals on the casting. With the valve body off the truck, cleaned and still assembled with its valves in place:
- Leave the valves at rest. Sonnax's guide shows OE valves in the rest position and says to test them there unless the diagram says otherwise.
- Test at the marked port. Put the tip on the port the diagram points to for each valve. Where the guide says to seal the port on the opposite side, block it first or the reading means nothing.
- Flip the casting where noted. Some ports on the upper body are tested from the other side, with the facing side sealed on a foam mat.
- Read the gauge. A good bore holds vacuum. Per Sonnax, a low reading indicates wear, and that valve needs the repair part noted on the guide.
- Test the whole body. Bores tend to wear together. If the modulator sleeve is gone at 200,000 miles, the accumulator regulator bores usually aren't far behind.
On the E4OD the accumulator body gets the most attention because it holds the modulator valve and all three accumulator regulator valves. On the upper body, check the manual valve bore even if the valve itself looks new. The steel valve rarely wears. The aluminum bore does, and it dumps apply oil to the pan in exactly the ranges that use it.
Step 5: Check the checkballs after any valve body work
A lot of "bad valve body" complaints show up the day after the valve body was out. Checkball layouts changed during E4OD production, so a ball copied from the wrong year's diagram is a real risk:
- No upshift in Drive, commands OK (1996-up). Transmission Digest's January 2001 issue traced this to a missing BS2 checkball in the main valve body. The fix is a 1/4 in. green rubber checkball, Ford part F6TZ-7E195BB, in the BS2 pocket.
- Slipping or no reverse. Transmission Digest's November 2001 issue lists a misplaced BS1 checkball on 1996-98 E4OD and 4R100 units, and BS1 or BS6 on earlier E4ODs. On 1989-95 units BS6 sits in the case, not the valve body, so it is easy to lose when the case is washed.
Repair the bores or replace the valve body
If one or two bores test bad on an otherwise clean casting, drop-in kits fix them. Sonnax's E4OD lineup covers the common ones: 36948-05K for the modulator plunger and sleeve, 36948-13K for the intermediate and direct clutch accumulator regulator valves, 36948-09K for the overdrive accumulator regulator valve, 36947-13K for an oversized manual valve and 36947-14 for the solenoid regulator valve. The oversized valves need Sonnax's reamer tools, so plan on that if you don't already own them.
If most of the bores test low, the casting is scored, or the truck needs to go back to work, a complete valve body matched to your casting year is usually the cheaper answer once you count reamer tools and labor. Either way, reassemble it right. ATSG has the solenoid body, main bodies and accumulator body run in hand tight first, then every bolt and nut torqued to 9-11 N-m (80-100 in-lb). More than that distorts the aluminum and creates the cross-leaks you just paid to fix. Change the fluid and filter with it, because whatever wore the bores is still in the old fluid.
Shop the part for this fix: Sonnax 1-2 and 2-3 accumulator control valve kit 36948-13K
If the vacuum test fails at the intermediate or direct clutch accumulator regulator bores (soft shifts, no 2nd or no 3rd), this drop-in kit replaces the worn valves on E4OD and 4R100 accumulator bodies.
See the accumulator control valve kit at CoreTransmissionPartsNeed parts for this job?
Our E4OD parts page has valve bodies by casting year, solenoid kits and rebuild kits, with checkout on site. Read the casting numbers on your main and accumulator bodies before you order.
FAQ
What are the symptoms of a bad E4OD valve body?
Soft or slipping 1-2 and 2-3 shifts, intermittent harsh shifts, a missing 2nd, 3rd or 4th gear, delayed or slipping reverse, no engine braking in manual 1, starts in 2nd or 3rd, and TCC cycling. Sonnax's E4OD/4R100 vacuum test guide ties each of those complaints to a specific valve, so the symptom tells you which bore to test.
How do I tell a bad valve body from a bad solenoid pack on an E4OD?
Check the electrical side first. Per ATSG, the shift solenoids should read 20-30 ohms and the EPC solenoid 3.0-5.0 ohms, and ATRA's method is to backprobe the EPC signal at case connector terminals M and L and watch it change with throttle. If codes are clear, the solenoids are in spec and the command is correct but the gear or pressure is still wrong, the fault is hydraulic.
How can I tell what year my E4OD valve body is?
Read the casting numbers. Per Sonnax, 1989 units have an E9 main valve body and E9 accumulator body, 1990-95 units have an F0 or F1 main body with an E9 accumulator body, and 1996-98 units have F6 on both. The 1996-98 castings share worm tracks and test points with the 4R100, while 1989-95 castings are laid out differently.
Can I vacuum test an E4OD valve body at home?
Yes, if you have a vacuum pump with a gauge and a rubber test tip. Sonnax's guide says to test each valve in its rest position at the marked port, seal the opposite side of the port where noted, and read the gauge. A low vacuum reading means that bore is worn and leaking.
What is the torque spec for E4OD valve body bolts?
ATSG's 4R100 manual, which covers the updated E4OD, has the solenoid body, main valve bodies and accumulator body run in hand tight first, then every valve body bolt and nut torqued to 9-11 N-m, which is 80-100 in-lb. Overtightening distorts the castings and causes the cross-leaks you just fixed.
Related guides
- E4OD Harsh Shift Causes and Fix
- E4OD Shift Solenoid Symptoms
- E4OD No Reverse: Diagnosis and Fix
- E4OD Rebuild Wear Points
- 4R100 Valve Body Problems and Testing
Sources
- Sonnax, "Ford E4OD, 4R100 Critical Wear Areas and Vacuum Test Locations" (PDF, 2026 revision). Backs the valve-by-valve symptom map, the rest-position testing rule, sealing the opposite port and flipping the casting on a foam mat, low vacuum = wear, and the note that 1996-98 E4OD worm tracks and test points match the 4R100 while 1989-95 differ. https://d2q1ebiag300ih.cloudfront.net/uploads/tech_resource/639/E4OD-4R100_VacTestGuide.pdf
- Sonnax, "Ford E4OD Valve Body Identification." Backs the casting numbers by year (1989 E9/E9, 1990-95 F0 or F1/E9, 1996-98 F6/F6), the F041/F040/F042 remanufactured bodies, and the lower body and spacer plate changing by generation. https://www.sonnax.com/tech_resources/251-ford-e4od-valve-body-identification
- ATRA, Ford E4OD/4R100 Quick Reference. Backs the computer-controlled design with EPC setting mainline pressure, the case connector pinout, the EPC signal check at terminals M and L, the line pressure tap location and the idle/stall pressure chart. https://atracom.blob.core.windows.net/bulletins/quick/ford/e4od/e4od_quick_ref.pdf
- ATSG, Ford 4R100 technical service manual (covers the updated E4OD). Backs the 20-30 ohm shift and coast clutch solenoid and 3.0-5.0 ohm EPC specs, the open/short EPC failure modes, the no-stall-test-if-low and 5-second WOT limits, and the hand-tight-then-9-11 N-m (80-100 in-lb) valve body torque. https://atoc.ru/uploads/manual/5fb798e27b192.pdf
- Transmission Digest, January 2001 issue, "Ford E4OD: No Upshift; Computer Commands OK." Backs the missing BS2 checkball on 1996-later units and the green 1/4 in. checkball F6TZ-7E195BB. https://www.transmissiondigest.com/january-2001-issue/
- Transmission Digest, November 2001 issue. Backs misplaced BS1 (1996-98 E4OD and 4R100) and BS1/BS6 (earlier E4OD) checkballs causing slipping or no reverse. https://www.transmissiondigest.com/november-2001-issue/
- Sonnax, Ford E4OD unit parts listing and line pressure modulator plunger valve kit 36948-05K. Backs the repair kit numbers and the intermittent harsh shift, low line rise and low EPC symptoms tied to modulator sleeve wear. https://www.sonnax.com/parts/2106-line-pressure-modulator-plunger-valve-kit