The 4L65E is the heavier-duty sibling of GM's 4L60E — a four-speed found behind small-block and LS trucks and SUVs like the Silverado and Sierra 1500, Tahoe, Suburban, and the SS models, along with the H2 Hummer. It shares almost the entire hydraulic layout with the 4L60E and 4L70E, and that means it shares the same set of aging valve body complaints. When a 4L65E starts shifting harsh, slipping under load, dropping the torque converter clutch, or setting solenoid codes that a new solenoid doesn't fix, the valve body is where the money usually is.
The catch with these units is that a worn valve bore throws codes and symptoms that look electrical. People replace solenoids, flash the computer, even swap the whole unit, and the complaint comes right back — because the actual leak is aluminum wearing against aluminum inside the valve body casting. This guide walks through the symptoms, a numbered bench-and-vehicle test procedure, the root causes, and how to decide between a bore repair and a replacement.
The short version: Most 4L65E valve body problems are worn bores, not bad parts. The pressure regulator/boost valve, the actuator feed limit (AFL) valve, the TCC regulator valve, and the shift valves all wear their aluminum bores and leak pressure. That leak reads as a solenoid code, low line pressure, TCC slip, or a harsh/soft shift. Test line pressure and vacuum-test each suspect bore before you condemn a solenoid or the whole transmission — the fix is often a targeted valve kit, not a new unit.
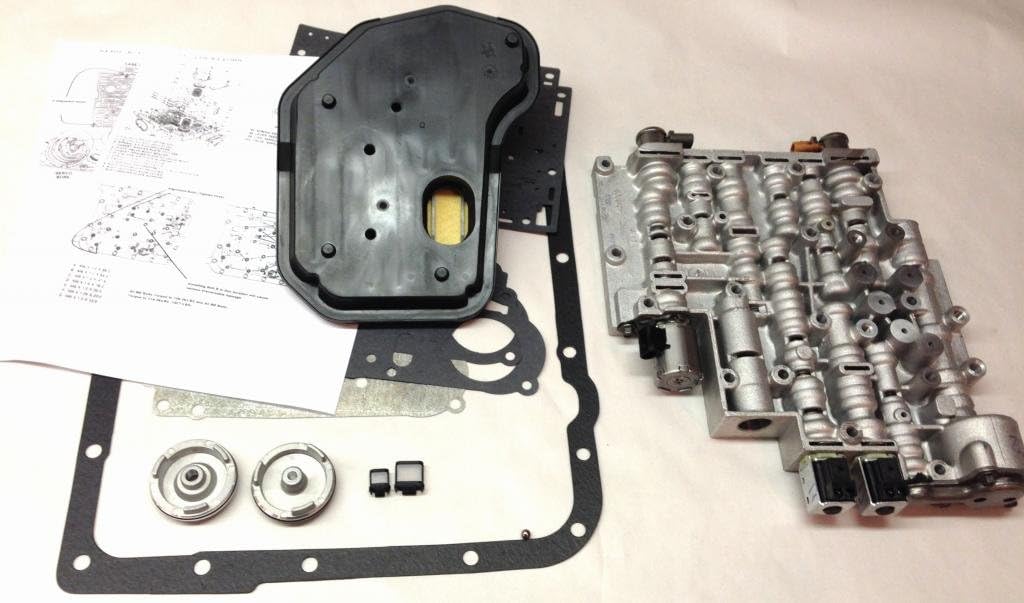
How the 4L65E Valve Body Works
The 4L65E is a hydraulically shifted, electronically controlled transmission. The pump makes line pressure; the pressure regulator (PR) valve and its boost valve set how high that pressure rises with load and in Reverse. From there, the actuator feed limit (AFL) valve regulates a clean, capped feed pressure to the EPC (pressure control) solenoid and the shift solenoids. The shift solenoids move the 1-2 and 2-3 shift valves, which route apply oil to the clutches and bands for each gear, and the TCC regulator valve meters converter clutch apply and release.
Every one of those valves rides in a bore machined directly into the aluminum valve body. Over years and miles, the valves oscillate and side-load against those bores and wear them oval. Once the bore is worn, the valve can no longer seal, and pressure that should be doing work bleeds off to exhaust instead. That is the single mechanism behind the majority of 4L65E valve body complaints.
Symptoms of a Failing 4L65E Valve Body
Because each worn bore leaks a different circuit, the 4L65E gives you fairly specific clues about which valve is the problem. Match the complaint to the circuit:
| Symptom | Likely worn valve/circuit |
|---|---|
| TCC slip, TCC cycling, code P1870, overheated converter | TCC regulator & isolator valve |
| Harsh shifts, erratic line pressure, wrong-gear starts, solenoid performance codes, no 4th | Actuator feed limit (AFL) valve |
| Low line rise, 3-4 clutch failure, 2-4 band failure, poor shift quality, reverse chatter, excess pump noise | Pressure regulator / boost valve |
| 2nd-gear starts, 3rd clutch failure, low AFL pressure, no 4th | 3-4 shift valve |
| Harsh or bang 1-2, reduced 2-4 band life | 1-2 accumulator / shift valve circuit |
| Delayed forward or reverse engagement, burnt low/reverse clutch | Forward & reverse abuse valve |
Per Sonnax, severe wear of the TCC regulator valve bore lets regulated converter apply pressure exhaust, which is a primary cause of TCC slip code P1870 and overheated converters — and because that same leak bleeds line pressure, it can burn clutches too. Worn AFL bores reduce pressure and volume to the solenoids, producing solenoid and ratio codes that a new solenoid won't cure. A worn PR/boost valve gives unstable line pressure: leak at the balance end and pressure can spike unregulated; leak at the spring end and line pressure drops.
How to Test Your 4L65E Valve Body
Diagnose in this order. The point is to confirm a hydraulic leak — and pin down which bore — before spending money on solenoids, a reman valve body, or a whole unit.
- Check fluid and pull codes first. The 4L65E uses Dexron VI. Dark, burnt fluid with debris points toward failed frictions and a mechanical problem; clean fluid with shift or solenoid codes leans hydraulic (worn bore). Note the exact codes — P1870 (TCC stuck off / slip), pressure-control and shift-solenoid performance codes, and ratio codes all steer you toward specific valves rather than a random solenoid swap.
- Test line pressure with a gauge. Connect a pressure gauge to the line pressure tap. With the engine at idle in Drive and again in Reverse, read line pressure, then snap the throttle to command a pressure rise. A worn PR/boost valve typically shows low line rise under boost — often 50 to 100 psi below spec in Reverse — or erratic, unstable pressure. High and unregulated pressure points to wear at the balance end of the PR valve. This single test separates a pump/PR-valve pressure problem from a shift-valve routing problem.
- Road-test for the shift-valve pattern. Confirm whether the unit makes clean 1-2, 2-3, and 3-4 shifts and holds 4th. A 2nd-gear start, a missing 4th, or a harsh/soft shift that pressure at the pump can't explain points at a shift valve or its feed rather than the pump.
- Vacuum-test each suspect bore on the bench. Pull the valve body and use a vacuum test plate and pump (Sonnax offers a 4L60E-family Vacuum Test Plate Kit). Seal the port that feeds the valve, apply vacuum, and read it: a good bore holds vacuum (typically holding at or near 18″ Hg), while a worn bore bleeds down quickly. Vacuum-testing is how you objectively grade a bore instead of guessing. Test these in turn:
- TCC regulator valve — a fast bleed-down here confirms the P1870/TCC-slip leak. Its housing bore runs about 1.360″.
- Pressure regulator / boost valve — a leak here matches the low or erratic line-pressure reading from step 2.
- Actuator feed limit (AFL) valve — a bleed-down confirms low solenoid feed behind wrong-gear starts, harsh shifts, and solenoid codes.
- 1-2 and 2-3 shift valves — check each valve for free movement (no stick or drag in the bore) and vacuum-test the bore. A sticking or leaking shift valve produces the harsh/soft or missed shift the road test flagged.
- Inspect valves and bores directly. With the valves out, look and feel for scoring, aluminum polishing, and oval wear at the lands. Confirm springs are intact (a broken 3-2 control valve spring is a common find) and check bore plugs and retainers for leaks. This visual pass, combined with the vacuum numbers, tells you exactly which kits the job needs.
Shop 4L65E valve body kits, TCC regulator and AFL valve kits, oversized pressure regulator and boost valves, reman valve bodies, Dexron VI, and the reaming tools to install them — shipped fast from the USA.
Shop 4L65E parts →Root Causes: Why the Bores Wear
The common thread is design plus mileage. Several OE valves have large reaction areas and are prone to side-loading, so they wear their aluminum bores oval over time. The three that fail most often on a 4L65E:
1. Pressure regulator and boost valve (the pump)
These set line pressure. As the bore wears, pressure becomes unstable — low line rise under load, or unregulated high pressure — producing harsh or soft shifts, 3-4 clutch failure, 2-4 band failure, reverse chatter, and excess pump noise. Sonnax addresses this with an oversized pressure regulator valve and a matched boost valve kit; TransGo offers a drop-in oversized PR valve for the same job. Because low line pressure starves clamping force, ignoring it burns clutches.
2. Actuator feed limit (AFL) valve
The AFL regulates feed to the EPC and shift solenoids. Its large reaction area makes it a heavy side-loader, so the bore wears and solenoid feed pressure drops. The result is wrong-gear starts, erratic line pressure, harsh shifts, reduced 2-4 band life, no 4th, and solenoid performance codes — symptoms people chase with new solenoids that never fix it.
3. TCC regulator valve
Oscillation wears the TCC regulator bore, letting converter apply pressure exhaust. That gives TCC slip and cycling, code P1870, and overheated converters, and the lost pressure also drags down line pressure enough to burn the 3-4 clutch. Sonnax's TCC regulator and isolator valve kit restores the circuit by reaming the bore and running a lengthened isolator valve in the unworn portion, with annular grooves that center the valve and cut future side-load wear.
Replacement: Bore Repair vs. Reman Valve Body
Once you know which bores are worn, you have three paths:
- Targeted valve kits (repair in place). If only one or two circuits are bad, ream the affected bores and install the matching Sonnax kits — TCC regulator/isolator, AFL valve, oversized PR and boost valves, or an oversized shift valve. This is the most cost-effective fix and it upgrades the valve above OE spec. It does require the correct reamer and guide tooling; without it, do not attempt the bore work.
- Reman / rebuilt valve body. If multiple bores are worn or you don't have the tooling, a remanufactured valve body with the wear points already corrected is the clean swap. It comes calibrated and saves bench time.
- Full unit. Only if the valve body damage comes with burnt frictions, a failed pump, or hard-part damage found during the road test and fluid inspection. Don't jump here on a code alone — that's how people pay for a transmission when a valve kit would have fixed it.
Whichever path you take, verify the fix the same way you diagnosed it: re-check line pressure at idle and under boost in Drive and Reverse, confirm clean 1-2/2-3/3-4 shifts and a solid 4th, and confirm the TCC applies and holds without slipping or cycling.
Working on the rest of the unit too? Our line pressure testing walkthrough covers the gauge procedure in detail, and the steps here apply directly to the 4L60E and 4L70E, which share this valve body.
Sources
- Sonnax — GM 4L60-E, 4L65-E, 4L70-E Valve Body Layout. Exploded valve-body diagram identifying the TCC regulator/isolator, actuator feed limit (AFL), pressure regulator and boost, 3-4 and 2-3 shift, forward/reverse abuse and accumulator valves, each valve's symptoms/benefits, and the recommended Sonnax repair parts and vacuum test tooling. sonnax.com/tech_resources/1059
- Sonnax — GM 4L60-E, 4L65-E, 4L70-E Vacuum Test Guide, on bench vacuum-testing valve body bores to grade wear before repair. sonnax.com/tech_resources/441
- Sonnax — TCC Regulator & Isolator Valve Kit (77754-04K), on worn TCC regulator bore wear causing P1870, TCC slip/cycling, overheated converters, and lost line pressure, and the reaming/isolator repair. sonnax.com/parts/2458-tcc-regulator-isolator-valve-kit
- Sonnax — Actuator Feed Limit Valve Kit (77754-09K), on AFL side-load bore wear reducing solenoid feed pressure and causing wrong-gear starts, harsh shifts, no 4th, and solenoid codes. sonnax.com/parts/2459-actuator-feed-limit-valve-kit
- Sonnax — Building the Killer 4L60E, tips on pump pressure problems and the oversized PR valve, boost valve, and AFL kit for restoring line pressure. sonnax.com/tech_resources/293-building-the-killer-4l60e
- TransGo — 4L60E-PR Drop-In Pressure Regulator Valve, on OE PR/boost valve bore wear causing unstable, low, or high line pressure and the symptoms (harsh/soft shifts, burnt frictions, overheating, converter clutch failure) across 4L60E/4L65E/4L70E. transgo.com/product-details/4l60e-pressure-regulator-valve