P0748 comes out of most code readers as Pressure Control Solenoid "A" Electrical. Look at how an OEM spells it out in its own service bulletins and it gets more specific: Line Pressure Control Solenoid Valve A Electrical. That is the useful version. The code is not telling you a clutch is slipping or a valve is stuck. It is telling you the control module tried to drive the line pressure solenoid circuit and the current or voltage it read back sat outside the window it expects.
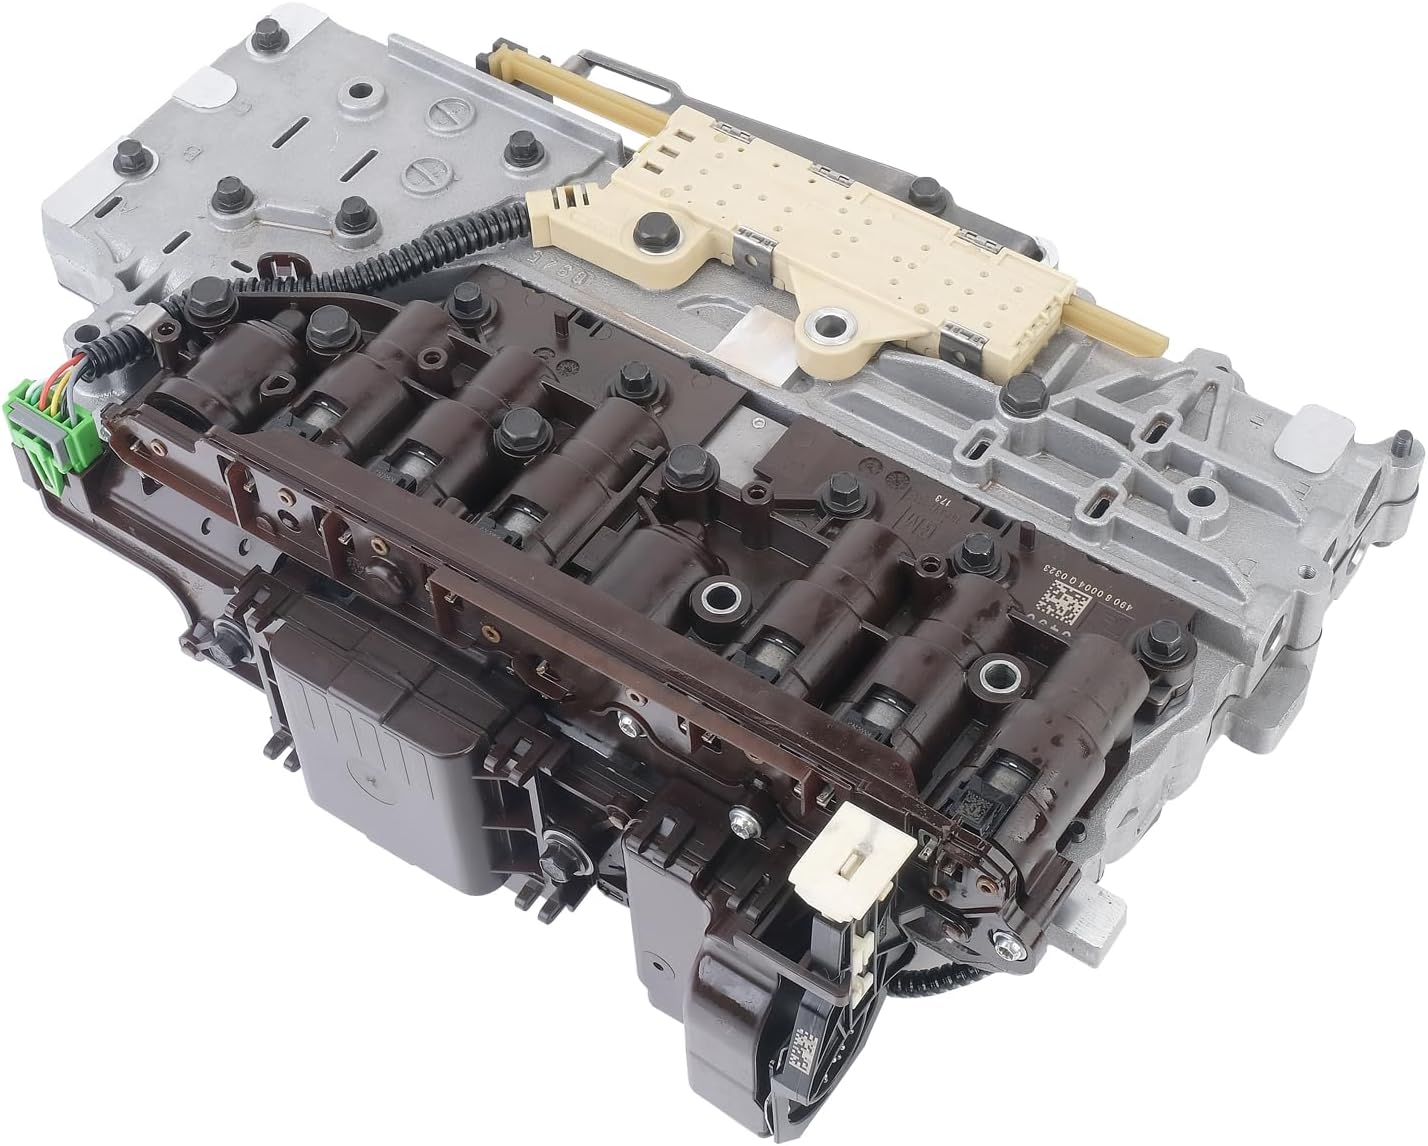
On a 4L60E that is a manageable conversation, because the EPC solenoid is a serviceable part with two pins you can put a meter on. On the 6L80 and 6L90 it is a different job entirely, and the reason is the TEHCM.
Related reading: our 6L80 valve body testing guide and the 4L60E P0748 write-up, which is the version of this code you actually can fix with a solenoid.
Why this code is harder on a 6L80 than on anything before it
The 6L series puts the transmission control module, the solenoids, the pressure switches and the temperature sensor into one assembly bolted to the valve body inside the pan: the Transmission Electro-Hydraulic Control Module. Sonnax describes the internals directly - the eight solenoids are connected to the TCM through a lead frame, and the lot of it is over-molded in the plastic housing, not accessible or serviceable separately.
Two consequences fall out of that, and they shape the whole diagnosis:
- You cannot ohm the solenoid. There is no connector between the module and the solenoid to break into. GEARS Magazine puts it the same way in its 6L80 troubleshooting coverage: this unit does not offer the ability to back probe electrical circuits to verify proper operation and commands.
- You cannot replace the solenoid alone. If the fault is inside the over-mold, the part number you are buying is a TEHCM, not a solenoid. That is a materially different repair cost, and it is worth knowing before you quote the job.
So the entire game becomes proving the fault is inside the module before you buy one. Everything below is aimed at that.
How the 6L80 actually makes line pressure
Understanding the circuit tells you what a failure should look like. Pressure in the 6L series is set by a pressure regulator valve that lives in the pump cover, and that valve's position is controlled by the pressure control solenoid inside the TEHCM. The regulator in turn controls the position of the pump slide, which controls pump volume. Pressure is resistance to flow, so as commanded solenoid current changes, the slide moves, volume changes, and line pressure follows.
That chain gives you the failure signature to look for. Sonnax reports that when the TEHCM line pressure solenoid ends up stuck in an exhaust mode, line pressure sits at roughly 60 to 68 psi with no RPM rise whatsoever - and adds the line worth memorizing: unplugged is no different. A dead circuit and a stuck solenoid produce the same gauge reading. That is precisely why P0748 gets misdiagnosed on these units. The gauge alone will not separate them.
Symptoms you will actually see
- Failsafe or limp: one fixed forward gear, no torque converter apply, no upshifts.
- Slammed or harsh garage shifts into Drive and Reverse, because the module defaults pressure high rather than let clutches slip.
- Or the opposite - soft, slipping, flared shifts if the circuit failed toward minimum pressure.
- Check engine light with P0748 alone, or bundled with other solenoid electrical codes and a lost-communication code. Multiple solenoid codes at once is a strong module-side signal.
- No line pressure rise off idle on a mechanical gauge.
Diagnosing it in order
1. Power and grounds, before anything else
An electrical code is a report about voltage and current. If the supply is bad, the report is unreliable. Load-test the battery, verify charging output, then physically inspect the powertrain ground straps and the case ground for corrosion or a loose fastener. A module fighting a marginal supply can set solenoid electrical codes with a perfectly healthy solenoid on the other end. This step is free and it saves more TEHCMs than anything else on this list.
2. Read every code, and the freeze frame, before you clear anything
Capture the freeze frame first. Clearing codes to see whether they come back destroys the data that tells you what the truck was doing when it failed. Note whether P0748 is alone or accompanied by P0747 (stuck on), other solenoid electrical codes, or a communication code. P0748 by itself points at one circuit. P0748 with three friends points at the module or its feed.
3. Watch the solenoid command in live data
This is the highest-value test you can run before anything comes apart, and it is the same decision point OEM service bulletins use for this code family. Put the vehicle in gear, drive it or load it in the bay, and watch the line pressure solenoid parameter:
- Continuous and changing output means the circuit between the module and the solenoid has no open or short. Move on to the module and the hydraulics.
- No continuous, changing output means you inspect the wiring harness between the control module and the transmission for a damaged wire or connector, and check for an open or short circuit, before you condemn a part.
4. The external harness and case connector
The 6L80 brings everything out through a pass-through connector on the case. It sits low, it lives in road spray, and it is a common source of the high resistance and intermittent faults that read as electrical codes. Unlatch it, look for green or white corrosion on the terminals, check for spread or backed-out pins, and follow the external harness where it routes over the case looking for chafe. This one is repairable. Pigtail kits exist for both the case connector and the internal harness, and a cheap pigtail beats a module every time.
5. Command the solenoid against a mechanical gauge
Hook a pressure gauge to the mainline port on the passenger side of the transmission. GEARS lays out the procedure: use the scan tool to observe the EPC command versus the actual reading on the gauge, then go into bi-directional controls (some tools file this under Functional Tests) and command the EPC solenoid amperage up and down while watching for a proper hydraulic response. If commanded current moves and pressure does not, you have proved the fault is downstream of the command.
6. The TCM fuse test
Here is the trick that separates hydraulic from electronic on this unit. If your test comes back out-of-range low, the GEARS method is to force the transmission into failsafe by locating and removing the TCM fuse. Killing power to the TCM puts the EPC solenoid in high-pressure demand. Now watch the gauge:
- Pressure jumps up - the solenoid and the hydraulic side can make pressure. The problem is in the control path.
- Pressure stays low but rises with engine speed - that pattern points at a pump output issue, not the solenoid.
- Pressure stays pinned around 60 to 68 psi with no rise at all - that is the stuck-in-exhaust signature Sonnax documents, and an unplugged circuit reads identically, so treat it as module-or-solenoid until proven otherwise.
7. Drop the pan and read the debris
Before you buy a TEHCM, look at what the fluid is telling you. These units mostly arrive because a torque converter is coming apart, and the metal migrates straight back into the pump and the cooler. That contamination causes valve and solenoid problems downstream, so a module that failed because of debris will fail again if you replace it and leave the source in place. Check the filter for a split or collapsed screen while you are in there - Sonnax notes that a broken or split sump filter can trace back to a pressure regulator bore problem.
8. Verify the pressure regulator side before you close it up
If the pump is already apart, know that a low-pressure complaint here is not always electrical. Transmission Digest published a bulletin-grade tech tip on exactly this: after installing GM service pump cover P/N 24248573, a transmission may have low line pressure caused by rust-inhibitor material in the service cover sticking the pressure regulator valve (#233) or the isolator valve (#236), or plugging the small orifice (#5) in the isolator valve sleeve (#237). The RI is a thick, waxy substance. Inspect and clean the cover and the regulator before assembly, because if you miss it the clutches pay for it.
The fix, and what it costs you
Three outcomes, in ascending order of pain:
- Wiring or connector. Repair the case connector or the internal harness with a pigtail kit, clear codes, verify. Cheapest possible ending, and more common than people expect.
- TEHCM. If the circuit is proven intact and the hydraulics respond correctly to a forced high-pressure command, the module is the answer. Sonnax lists solenoid electrical circuit faults and solenoid performance codes as exactly what their remanufactured 6L80/6L90 TEHCMs are built to cure. Match the OE part number to the application - the C5-generation unit covers OE numbers including 24251029, 24251412, 24254908, 24256051, 24256124, 24257141, 24258304, 24275874 and 24257237.
- Pump, regulator or converter. If the gauge says the hydraulics cannot make pressure regardless of command, the module was never the problem and the unit is coming out.
Installation numbers that matter
From Sonnax's published TEHCM installation instructions, so you are not guessing on reassembly:
- Install the filter screen, then the four 10 mm head bolts, two 8 mm side bolts (finger-tighten those first so there is no gap between the TEHCM and the valve body), and five 7 mm head bolts. Torque all TEHCM bolts to 71 in-lb.
- Input and output speed sensor and harness attaching bolts: 100 in-lb.
- Valve body-to-case attaching bolts: 100 in-lb.
- Air-check the circuits with low regulated air pressure while the valve body is out. Finding a problem now is free. Finding it after the pan is on is not.
- Install the case connector sleeve, then push in the white electrical connector slide lock. It is easy to leave that lock out and spend a week chasing an intermittent you created yourself.
- Fill with DEXRON VI to factory spec. Set the final level by GM's fluid-temperature check procedure rather than a quart count, because level moves pressure directly.
Programming is not optional
The TEHCM contains the TCM. A replacement unit has to be reprogrammed on the vehicle with a J2534 device before it will function, with a battery charger connected. Sonnax's sequence: warm the fluid to approximately 185 F, program, verify fluid temperature, then perform the fast adapt - and a battery disconnect will not substitute for it. Road test 10 to 15 upshift and downshift cycles at light throttle through all six speeds plus a few passing-gear pulls at speed. A small 2-3 upshift flare, a clunk into 4th and a 3-2 downshift clunk during adaptive relearn are normal, and typically resolve inside those 10 to 15 cycles.
One more warning worth repeating, because it turns a finished job into a comeback: Sonnax notes that an incorrect part number or an incorrectly programmed TEHCM may cause a no-movement or no-upshift condition. Verify the part number and the program file against the VIN before the pan goes back on. That same tech article flags a quirk of the relearn - a temporary no-move can occur during OE programming or the relearn process, and the fix is to remove the scanner, pull the key, open and close the driver door, wait 15 to 20 minutes and come back. It is usually good to go. Do not tear a transmission apart over that.
Keeping it from coming back
- Fix the source of the debris. A TEHCM installed into a system still full of converter metal is a warranty claim waiting to happen. Replace the cooler or verify it flows clean, and address the pump and converter if they are the root cause.
- Service the fluid on a real interval. DEXRON VI only. Clean fluid keeps solenoid screens and valve bores doing their job, which keeps the electrical side out of a fight it should never have been in.
- Treat the case connector as a service item. On a truck that lives in road salt, cleaning and protecting that connector during any pan service is a five-minute insurance policy against an intermittent electrical code two winters from now.
- Handle the module correctly. Use an ESD strap. The TEHCM is a computer, and a static discharge on the bench does not announce itself until the truck is back together and out the door.
Need the part for this one
If the circuit tests intact and the hydraulics respond to a forced high-pressure command, the line pressure solenoid is sealed inside the module and the TEHCM is the repair. If it traced to the case connector instead, the case connector pigtail repair kit is the cheap ending. Both are at CoreTransmissionParts, along with the full 6L80 catalog.
6L80 TEHCM, OEM 24275873 →FAQ
Can you replace just the pressure control solenoid on a 6L80?
No. On the 6L80 and 6L90 the eight solenoids are connected to the transmission control module through a lead frame, and the whole assembly is over-molded into the plastic TEHCM housing. Sonnax states plainly that those parts are not accessible or serviceable separately. There is no individual line pressure solenoid you can unbolt and swap the way you can on a 4L60E. If the fault is genuinely inside the module, the repair is a replacement or remanufactured TEHCM, followed by J2534 reprogramming to the vehicle VIN.
Is P0748 the same as P0747 on a 6L80?
They are neighbors, not twins. P0748 is the electrical circuit code: the module cannot drive the line pressure control solenoid circuit within its expected current or voltage window. P0747 is the stuck-on code, where the circuit is electrically fine but the hydraulic result is wrong. That distinction matters, because P0747 pushes you toward the pressure regulator valve, the boost valve and pump wear, while P0748 points first at the circuit and the module. Pull both codes and the freeze frame before you decide.
Will a 6L80 still drive with P0748 set?
Usually yes, in failsafe. Expect a fixed gear, no converter lockup, and a harsh or slammed engagement, because the module defaults line pressure high rather than risk slipping clutches. It is drivable to the shop. It is not something to tow with or leave alone for weeks, since running the converter unlocked at maximum line pressure builds heat, and heat is what kills the clutch packs you are trying to save.
How do I tell a wiring P0748 from a bad TEHCM?
Watch the solenoid parameter on a scan tool while the vehicle is running and driving. If the commanded output is continuous and changing, the circuit between the module and the solenoid is intact and you are looking at the module or the hydraulics. If there is no continuous, changing output, inspect the external harness and the case pass-through connector for an open or short before you order anything. That is the same order of operations OEM service bulletins use for this exact code family.
Do I have to reprogram a replacement 6L80 TEHCM?
Yes, and skipping it will not work. The TEHCM contains the transmission control module itself, so a replacement arrives carrying someone else's VIN and calibration. Sonnax's installation instructions require J2534 reprogramming on the vehicle before operation, and Sonnax's tech article warns that an incorrect part number or an incorrectly programmed TEHCM can produce a no-movement or no-upshift condition. Verify the part number against the VIN, program it, then perform the fast adapt reset.