P0961 shows up on a scan tool as Pressure Control Solenoid "A" Control Circuit Range/Performance, and that generic wording sends a lot of techs straight to a parts catalog. On a 6L90 that is usually the wrong first move. This is not a circuit-open code and it is not a circuit-low or circuit-high code. It is a performance code, which means the transmission control module commanded a specific current through the line pressure control solenoid, measured what actually flowed, and could not reconcile the two.
Understanding what the module is actually comparing is what keeps you from replacing a solenoid that was doing its job. Below is the mechanism, the diagnostic order that works, and the three failures that fake this code most often.
What the line pressure control solenoid actually does
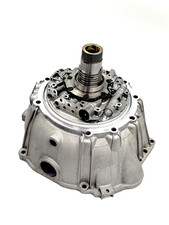
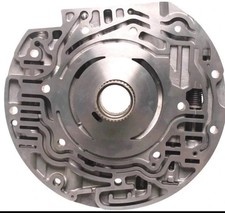
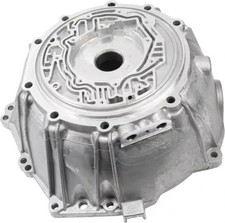
The line pressure control solenoid, often called PCS1 or the EPC solenoid, is a variable-current solenoid built into the control solenoid valve and TCM assembly - the TEHCM - inside the transmission. It is not a bolt-on part hanging off the case. It does not set line pressure directly either. It meters a control pressure that acts on the pressure regulator valve in the pump, and that valve does the regulating.
The relationship is inverse, and this trips people up. The module varies current from roughly 0.1 amp for maximum line pressure to about 1.1 amps for minimum line pressure. Decreasing current raises line pressure control oil by closing off the solenoid exhaust port. Increasing current lowers it by opening that exhaust port. So a solenoid that loses its ground or its feed does not go to zero pressure - it defaults toward maximum, which is why a failed circuit gives you a truck that bangs into gear rather than one that will not move.
P0961 sets when the measured solenoid current does not equal the commanded solenoid current for about 5 seconds. That is a comparison between two electrical values. Anything that corrupts either side of that comparison - the command, the measurement, or the reference the module is working from - can set the code without a single mechanical part being worn.
Read the whole code set before you touch anything
This is the highest-value 30 seconds in the entire diagnosis. P0961 rarely arrives alone, and what it arrives with tells you where to go.
If you are looking at P0961 together with P0965, P0969 and P2762 - three or four of them stored at once - stop and check the battery before you drop the pan. GM published Preliminary Information bulletin PI0690B in September 2014 covering 2010-2015 Chevrolet Express and GMC Savana vans with the 6L90 (RPO MYD), and it states plainly that this DTC combination is likely the result of improper battery grounding.
The scenario is an upfitter vehicle - an ambulance, shuttle bus or work van - where the battery has been relocated out of the underhood position. Per the bulletin, grounding cannot be done through the frame rail. The battery must be grounded directly to the engine. GM's fix is either to put the battery back in the OE underhood location and restore the original power and ground connections, or to install an isolated ground stud underhood near the original battery location, run new 00 gage or larger cable from the remote battery to that stud, and tie the original underhood ground cable to it while confirming G104, G105 and G106 are secure. The bulletin also calls out G103 at the rear of the left-hand cylinder head as a connection that has to be clean and tight.
That is a wiring repair on a van that would otherwise be getting a transmission. GM also notes the grounding repair is not warranty when an upfitter relocated the batteries.
One more thing from the same bulletin, and it is good practice regardless: after correcting the grounding, inspect the fluid. If it is still red with no burnt odor, clear the codes and drive it. If the fluid is distressed, drop the pan and look for clutch material, because the erratic pressure may already have cost you clutches.
Verify fluid before you verify anything else
This is a pressure control code, so fluid level and condition are part of the diagnosis rather than a box to tick. The 6L90 (RPO MYD) takes DEXRON VI, and the GM TechLink transmission capacities chart lists a fluid change capacity of 5.7 liters / 6.0 quarts. That chart carries an explicit note that DEXRON III is not acceptable on DEXRON VI applications. Low fluid aerates, aerated fluid will not hold a regulated pressure, and the module sees the resulting instability as a performance fault.
Test the hydraulic response, not the part
Once grounds and fluid are clean, get a real measurement. ATRA's guidance for this family is to hook a pressure gauge to the mainline port on the passenger side of the transmission, then use the scan tool to watch EPC command versus the actual gauge reading. Go into transmission bidirectional controls - some tools file this under Functional Tests - and with the engine running, command the EPC solenoid current up and down while watching the gauge follow.
What you are looking for is tracking. Pressure should move predictably and inversely with commanded current. If it tracks cleanly, the solenoid is doing its job and your problem is elsewhere.
If the reading is out of range low, pull the TCM fuse. Killing power to the TCM puts the EPC solenoid in high-pressure demand. Now watch the gauge: if line pressure is still relatively low at idle but rises when you bring up engine speed, that points at pump output rather than pressure control. ATRA's blunt summary of this family is that the EPC solenoid is less likely to fail than the things around it, so work by elimination and let the TEHCM be the last thing you condemn, not the first.
Sonnax 104520-15K PR valve kit → or browse all 6L90 parts →
The pressure regulator valve bore: the failure that fakes a solenoid code
Here is the mechanical heart of it. The pressure regulator valve oscillates continuously in service, and that constant motion wears its bore in the pump. Sonnax documents the resulting problems across the whole 6L45 / 6L50 / 6L80 / 6L90 family, and the two wear locations produce opposite complaints:
- Balance spool end wear allows critical fluid loss, which results in high line pressure, harsh shifts, and overheating from reduced cooler and converter flow.
- Outboard spool wear robs converter feed pressure and lowers line pressure, giving soft shifts and burnt clutches.
Either way, the module is commanding a current and getting a pressure response that does not match its model of the system. That is exactly the condition a range/performance code is written to catch.
Vacuum testing the pump
Do not eyeball this. Per the Sonnax vacuum test guide for the 6L45-6L90 family, a low vacuum reading at the test port indicates wear. For the pressure regulator valve, block the outboard end with a .125 inch thick nut, test both ports simultaneously, and remove the nut after testing. The guide lists the pressure regulator valve symptoms as erratic, high and low line pressure, clutch slippage, harsh shifts, low or no cooler flow, and soft shifts - and the boost assembly as causing overheating, converter concerns, low line rise in Drive, soft shifts and burnt clutches.
The other valve nobody checks: actuator feed limit
The actuator feed limit (AFL) valve is what supplies the solenoids a controlled, limited pressure to work with. When its bore wears, the feed the solenoids regulate from is no longer stable. Sonnax lists the AFL valve's symptoms explicitly as solenoid performance codes, clutch failure, wrong gear starts, and harsh or soft shifts. If you have a P0961 with no grounding issue, good fluid and a pressure regulator bore that vacuum tests acceptably, put the AFL valve on your list - Sonnax covers it with 104740-47K or 104740-50.
Fixing the bore
For a bore with moderate wear, the drop-in repair is the Sonnax 104520-15K pressure regulator valve kit. It uses a hardcoat anodized aluminum valve with lengthened critical spools that ride in the non-worn portion of the bore, annular grooves to center the valve and cut future side-load wear, and a replacement outer spring that also restores tension lost in the original - worth a modest 5 psi increase across the pressure curve. The pump has to come out to install it.
Note the revision history, because there is a lot of outdated instruction floating around: 104520-15K replaces the discontinued 104520-14K, and it no longer requires drilling the pump. The old 14K kit did require drilling a small hole to prevent excessive line pressure. If you are working from an older writeup or video that tells you to drill, check your kit number first.
For severe wear, the bore has to be reconditioned and fitted with the oversized 104520-16K pressure regulator and boost valve kit, which replaces the discontinued 104520-07K. That job requires the VB-FIX reaming fixture plus the VB-06 unless the stator support shaft is removed from the pump body. Sonnax also notes wear at the boost sleeve causes Reverse issues, and warns that some worn valve and pump bodies simply cannot be salvaged - know when to stop.
The service pump cover trap
This one causes comebacks on freshly rebuilt units, and it is worth knowing before you finish the job. Transmission Digest documents that on 2006-2015 GM cars and trucks with the 6L80 or 6L90, installing service pump cover P/N 24248573 can produce low line pressure - and if it is not caught, it damages clutches.
The cause is rust inhibitor material left in the service cover. It is a thick, waxy substance, and it can stick the pressure regulator valve (#233) or the isolator valve (#236), or plug the small orifice (#5) in the isolator valve sleeve (#237). Inspect the cover and the pressure regulator valve for it before you install the cover. To get in there, press the isolator sleeve (#237) inward and let the pin (#223) drop out of the cover; the sleeve comes out, the isolator valve (#236) comes out of the sleeve, and you can check the orifice for plugging.
Deciding whether to reuse the pump
If you are already in the pump, measure it rather than trusting how it looks. A previously rebuilt unit especially - clean surfaces do not mean in-spec surfaces. ATRA's numbers for this family:
- Slide and rotor clearance: .0008 inch to .002 inch. Check it with Plastigage. A straight edge and feeler gauge is impractical at that range.
- Nominal rotor and slide thickness: about 0.707 inch. Low pressure, delayed engagements when hot, or a shaky needle on the gauge at idle all point here.
- Slide return pocket depth in the bell housing: 0.020 inch clearance or more, so the coils do not bind when the pump is fully assembled.
- Desired endplay: 0.004 inch to 0.006 inch. If the stator or bell housing was machined, the material removed has to be added to your total shim measurement.
The reason this matters for P0961 specifically: a binding slide from a distorted pump pocket causes excessively high or low line pressure. That is a pressure control fault the module will happily blame on the solenoid circuit.
Diagnostic order that works
- Pull all codes. If P0965, P0969 or P2762 are along for the ride, inspect battery location and grounding per PI0690B before anything else.
- Check fluid level and condition. DEXRON VI only. Burnt fluid means the pan comes off.
- Gauge the mainline tap. Command EPC current up and down with bidirectional controls and confirm pressure tracks inversely.
- If low, pull the TCM fuse for max pressure demand. Pressure that stays low at idle but rises with RPM indicates pump output.
- In the pump: vacuum test the pressure regulator valve (block outboard with a .125 inch nut, both ports at once) and the actuator feed limit valve.
- Repair the bore with 104520-15K, or recondition and fit 104520-16K if wear is severe. AFL wear gets 104740-47K or 104740-50.
- Inspect any service pump cover for rust inhibitor before installation.
- Condemn the TEHCM last, not first.
Preventing the repeat
Most of what wears the pressure regulator bore is time and oscillation, but heat and debris accelerate it. If this unit came in behind a converter failure, assume the cooler is contaminated - aluminum embeds in the cooler and acts as an insulator, and low pressure drop auxiliary coolers cannot be effectively flushed at all. Replace rather than flush those. Keep the fluid on spec and on schedule, and address the cooler bypass valve while the unit is out.
FAQ
Is 6L90 P0961 a bad pressure control solenoid?
Usually not. P0961 is a range/performance code, which means the transmission control module compared the line pressure control solenoid current it commanded against the current it actually measured and found a mismatch it could not explain for about 5 seconds. Anything that corrupts that comparison sets the code, and the solenoid itself is one of the less likely failures in the chain. ATRA's own guidance for this family is that the EPC solenoid rarely fails, so you work by process of elimination rather than replacing it first.
Why did P0961, P0965, P0969 and P2762 all set at the same time?
Because that specific combination usually is not a transmission fault at all. GM Preliminary Information bulletin PI0690B covers 2010-2015 Chevrolet Express and GMC Savana vans with the 6L90 (RPO MYD) and states that when three or all four of those DTCs set together, they are likely the result of improper battery grounding. The common trigger is an upfitter relocating the battery and grounding it through the frame rail. GM is explicit that the frame rail is not an acceptable ground path and the battery must be grounded directly to the engine.
Can a worn pressure regulator valve set a line pressure solenoid code?
Yes, and this is the failure most often missed. The solenoid only meters a control signal; the pressure regulator valve in the pump does the actual regulating. Sonnax documents that continuous oscillation of that valve wears the bore, and that wear at the balance spool end causes high line pressure and harsh shifts while wear at the outboard spool lowers line pressure and burns clutches. Sonnax also lists solenoid performance codes as a symptom of actuator feed limit valve wear, because the AFL valve is what feeds the solenoids a controlled pressure in the first place.
What line pressure should a 6L90 make?
Rather than chasing one number, test the response. Hook a gauge to the mainline tap on the passenger side of the transmission, then use scan tool bidirectional controls to command the EPC solenoid current up and down while watching the gauge follow. If the reading is out of range low, pull the TCM fuse: killing power to the TCM drives the solenoid to maximum pressure demand. If pressure is still low at idle but climbs with engine speed, you are looking at a pump output problem rather than a control problem. Compare the actual figures to the pressure chart in the service information for that specific application and model year.
Does a 6L90 P0961 repair need a specific fluid?
Yes. GM specifies DEXRON VI for the 6L90 (RPO MYD), and the GM TechLink capacities chart lists a fluid change capacity of 5.7 liters or 6.0 quarts. That chart carries an explicit note that DEXRON III is not acceptable on DEXRON VI applications. Since this code is a pressure control fault, fluid level and condition are part of the diagnosis, not an afterthought - check level at the correct temperature before you condemn any hardware.