The Chrysler 68RFE lives behind the 6.7L Cummins in the '07–'20 Ram 2500 and 3500, and it is one of the busiest units on any diesel bench today — partly because there are so many of them on the road, and partly because owners keep adding power, tires, and tuning that the factory never planned for. When one of these trucks comes in shifting badly, the valve body is where a large share of the trouble actually lives. And the trap is the same one that catches people on every clutch-to-clutch transmission: a code that names a solenoid, when the real fault is a worn valve bore that no solenoid swap will fix.
This is how 68RFE valve body problems actually show up, what the codes are really telling you, and a step-by-step way to test the valve body before you spend a dollar on parts.
The short version: Most 68RFE harsh-shift, flare, no-reverse, and limp-mode complaints trace back to low or unstable line pressure and internal cross-leaks in the valve body — not to a single dead solenoid. A worn pressure regulator valve bore, leaking solenoid switch valve (SSV) plugs, or a warped solenoid conductor plate all bleed off pressure and set solenoid- and pressure-sounding codes. Confirm line pressure and bore condition before you buy a solenoid pack. That order is the whole game.
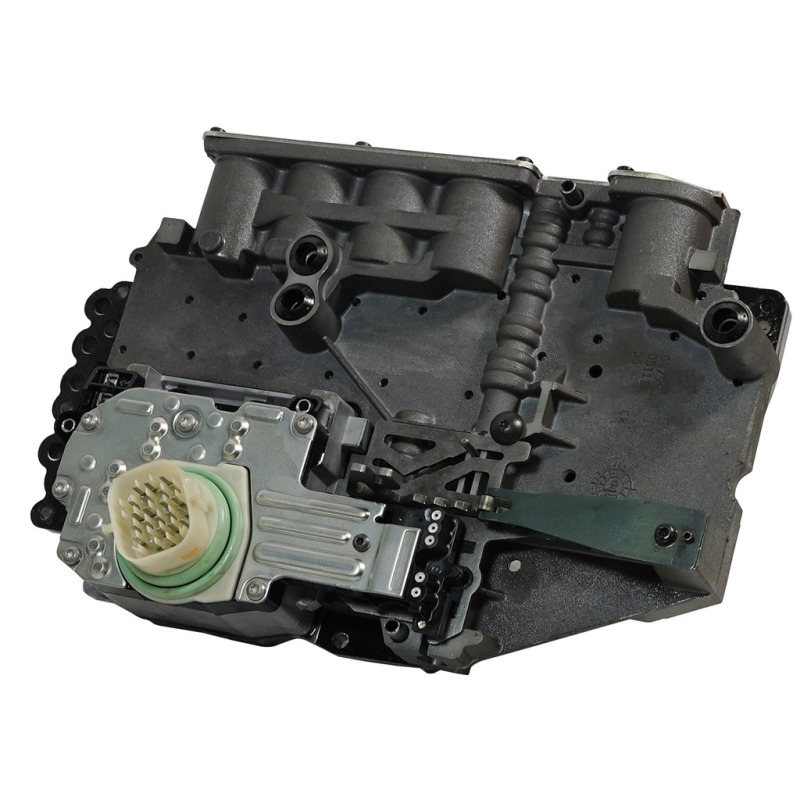

What the 68RFE Valve Body Does
The 68RFE is a six-speed, electronically controlled, clutch-to-clutch transmission. There is no governor or throttle cable — the transmission control module (TCM) meters clutch apply and line pressure through solenoids feeding a stack of valves in the valve body. Line pressure itself is set by a variable-force pressure control solenoid working against the pressure regulator valve, and the TCM watches a line pressure sensor to close the loop. On a scan tool that shows up as two numbers: desired line pressure (what the computer is commanding) and actual line pressure (what the sensor reports back). When the solenoid and sensor are healthy, those two numbers track each other closely.
Sonnax's valve body layout for the RFE family identifies the individual valve trains that do this work — the pressure regulator valve, the solenoid switch valve and its plugs, the low/reverse switch valve, and the torque converter regulator/accumulator valves — and each of those bores is a place where aluminum wear can quietly leak away pressure. That is the map you diagnose against.
Symptoms of a Failing 68RFE Valve Body
Because every clutch apply depends on clean, held pressure from the valve body, a worn valve body produces a familiar cluster of complaints:
- Harsh, banging, or erratic shifts. A worn pressure regulator valve bore causes erratic or high line pressure, which slams the clutches. Sonnax lists harsh shifts and erratic line pressure as the direct symptoms of PR valve bore wear.
- Flare and slip on the shift. Cross-leaks drop apply pressure so a clutch cannot fully hold, letting engine speed flare between gears before it grabs. Low apply force also burns clutches over time.
- No reverse or delayed reverse. A worn low/reverse switch valve circuit produces delayed reverse, no reverse, or a burnt low/reverse clutch.
- Overdrive clutch burn-up. Leaking solenoid switch valve plugs cross-leak into and out of the OD circuit, dropping holding force so the OD clutches slip and cook — the single most common 68RFE failure.
- Limp / failsafe mode. When the TCM sees pressure or ratio faults it cannot reconcile, it drops the unit into limp (commonly locked in a single gear) to protect the clutches.
- Torque converter shudder, no lockup, or engine stall from worn TCC regulator, accumulator, or switch valves in the same valve body.
The Codes, and What They Actually Point To
Here is the part that saves money. Most of the codes below sound electrical, but on a high-mileage 68RFE they are very often hydraulic — a worn bore or a leaking plug bleeding off the pressure the computer is commanding. Sonnax ties this whole family of codes to solenoid switch valve and pressure problems in the valve body, not automatically to the solenoid itself.
| Code | Meaning | Common valve-body cause |
|---|---|---|
| P0868 | Line pressure low | PR valve bore wear, cross-leaks, failing pressure sensor |
| P0869 / P0944 | Line pressure high / loss of prime | PR valve stuck or bore wear, low fluid |
| P0871 | Solenoid switch valve latched / performance | Worn SSV bore & leaking plugs |
| P0731–P0736 | Gear ratio incorrect | Clutch slip from low apply pressure |
| P0841 / P0988 | Pressure switch rationality | Circuit leaks, warped solenoid conductor plate |
| P0700 | TCM has a stored code | Flag only — read the real code behind it |
A "solenoid" or "pressure" code does not prove the solenoid is dead. As Sonnax notes for the RFE family, leaking solenoid switch valve plugs and worn valve bores set the same 841/868/871/988 codes that people blame on the solenoid pack. That is exactly why you test pressure and bore condition first.
The Real Root Causes Inside the Valve Body
1. Worn pressure regulator valve bore (line pressure instability)
Excessive wear in the OE pressure regulator valve bore lets critical oil escape, so the PR valve can't hold its regulating position. The result is erratic or high line pressure, harsh shifts, and in bad cases broken hard parts from over-pressure. The fix is to recondition the bore and install an oversized PR valve; Sonnax's oversized kit 44912-10K is the reference repair for this exact wear.
2. Leaking solenoid switch valve (SSV) plugs (OD circuit cross-leaks)
The SSV and its plugs cycle constantly and wear the casting, cross-leaking into and out of the overdrive circuit. That pressure loss lowers OD clutch holding force, so the clutches slip, heat, and fail — and it commonly triggers P0871. Chrysler used two switch-valve diameters (.420" and.453"), and the correct repair depends on which one your unit has.
3. Warped solenoid conductor plate (pressure bleed-off)
The solenoid conductor plate is unsupported on one side while the connector seal loads the other, so over time it warps and bleeds apply pressure away from the circuit, causing repeat OD failures and intermittent pressure-switch codes. This one hides well because the solenoids themselves test fine.
4. Poor separator-plate sealing
High line pressure can push past the thin OE separator plate where it seats against a rough casting, sending pressure where it doesn't belong. Improved gaskets exist specifically to address this.
How to Test Your 68RFE Valve Body
The order below matters because the price swings from a fluid-and-filter service to a full valve body. Rule out the cheap and the electrical before you condemn the casting.
- Set the fluid level and check condition first. The 68RFE is fussy about level — both overfilled and underfilled cause low-pressure symptoms, and the wrong reading often follows a recent service or a clogged filter. Use ATF+4 to spec and at the correct temperature. Dark, burnt fluid with debris points toward burnt clutches; clean fluid with a pressure code leans hydraulic.
- Pull every code and write down the exact number. Do not act on the word "solenoid" in a description. P0700 is only a flag — read the real code behind it. Note whether you have pressure codes (868/869), an SSV code (871), or ratio codes (0731–0736).
- Compare desired vs. actual line pressure on a scan tool. With the solenoid and sensor healthy, desired and actual should track closely. If desired line pressure sits pinned near its minimum duty cycle while actual pressure falls short, the unit is leaking pressure faster than the pump can supply it — a valve-body/hydraulic fault, not a lazy solenoid.
- Verify line pressure mechanically. A failed line pressure sensor can hide a real low-pressure condition, so don't trust the scan number alone. Install the OE line pressure adapter (Sonnax references tool No. 8259) in place of the sensor and read main line pressure on a mechanical gauge, which also confirms the sensor is telling the truth.
- Inspect the solenoid pack and conductor plate. Check the connector pins and terminals — faulty solder/crimp at the line pressure sensor connector is a known offender — and look for a warped conductor plate before assuming the solenoids are bad.
- Vacuum-test the valve bores. With the valve body on the bench, vacuum testing is the reliable way to locate and rank leaks. Test the solenoid switch valve bore, the pressure regulator valve bore, and the TCC/accumulator bores. A bore that won't hold vacuum is worn and is your leak. Reamed bores with oversized Sonnax valves restore the seal; severe wear or a warped plate is where a corrected or remanufactured valve body earns its keep.
- If bores are good but clutches are burnt, the pressure loss was already doing damage — the valve body still needs correcting, and the burnt clutch pack (usually overdrive) comes out for replacement.
Run that sequence and the 68RFE stops being a parts-cannon guessing game. A large share of "bad solenoid" trucks are actually a worn PR bore or leaking SSV plugs, and you'll know which before you open your wallet. If you're checking pressure, our line pressure testing walkthrough covers the gauge procedure in detail.
Repair vs. Replace: What Goes Back In
Once you've confirmed a valve body fault, you have two honest paths. You can correct the individual bores — ream and install oversized valves, reseal the SSV plugs, add a conductor-plate spacer and a better separator gasket — which is ideal on a unit with otherwise-good hard parts and someone with the tooling to do it. Or, for most shops and every DIY build, the faster and more repeatable answer is a remanufactured 68RFE valve body that already has the worn bores corrected and the known weak points addressed, so you bolt on known-good pressure control instead of chasing leaks one bore at a time. Either way, replace the solenoid pack only if it actually failed a test — not on spec.
Remanufactured 68RFE Valve Bodies
Skip the guesswork. Our remanufactured 68RFE valve bodies come with the pressure regulator and solenoid switch valve bores corrected, upgraded sealing, and pressure-tested control — plus solenoid packs, separator plates, ATF+4, and the tools to install them.
Shop 68RFE valve bodies & parts →Sources
- Sonnax — Chrysler 45RFE, 545RFE, 65RFE, 66RFE, 68RFE Valve Body Layout, the exploded-view reference identifying each valve train (pressure regulator, solenoid switch valve and plugs, low/reverse switch, TCC valves) and the symptoms/codes tied to each bore. sonnax.com/tech_resources/621
- Sonnax — 68RFE Overdrive Clutch Failure: What to Check First When Troubleshooting OD Issues, on leaking solenoid switch valve plugs, warped solenoid conductor plate, line pressure verification (tool No. 8259), and separator-plate sealing. sonnax.com/tech_resources/888
- Sonnax — Oversized Pressure Regulator Valve Kit 44912-10K, on PR valve bore wear causing erratic/high line pressure and the reconditioning fix. sonnax.com/parts/4453-oversized-pressure-regulator-valve-kit
- GEARS Magazine (ATRA) — Fixing the Root Cause of the Problem: Solving Issues with the 68RFE Transmission, on low-pressure management, desired vs. actual line pressure duty cycle, and valve-bore wear (PR, TCC regulator, accumulator, SSV). gearsmagazine.com/magazine/fixing-the-root-cause...68rfe
- GEARS Magazine (ATRA) — Diagnosing Pressure Trouble Codes, on RFE line pressure control, sensor voltage, P0868/P0869 criteria, and connector/terminal faults. gearsmagazine.com/magazine/diagnosing-pressure-trouble-codes