A 4L80E that drives perfectly forward and does nothing in Reverse is one of the easier complaints to solve and one of the easiest to overspend on. The temptation is to pull the unit, because "no Reverse" sounds terminal. Plenty of these are a band-apply problem you can reach with the pan down.
The method below is the one Sonnax TASC Force specialist Randall Schroeder published for this exact complaint: split the circuits. Separate the hydraulic, the electrical and the mechanical, and prove each one before you move on. Do that and the unit tells you whether it has to come out.
What actually makes Reverse in a 4L80E
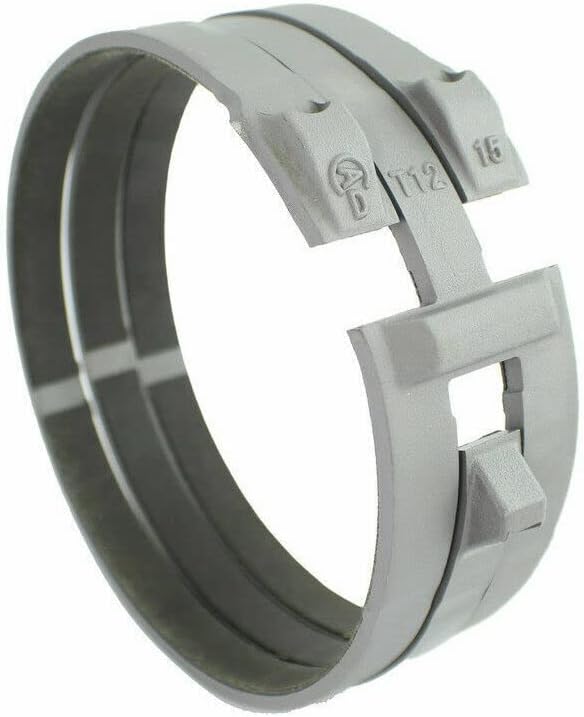
Two elements, and only two. Per the Sonnax diagnostic on this unit, the players in Reverse are the direct clutch and the low/reverse band. What makes the diagnosis workable is that both of them get used somewhere else in the gear train:
| Element | Used in Reverse | Also used in | What that buys you |
|---|---|---|---|
| Direct clutch | Yes | 3rd and 4th gear | If 3rd and 4th are good, the direct clutch is capable of working |
| Low/reverse band | Yes | Engine braking in manual 1st | If manual low holds the vehicle back, the band is capable of holding |
That table is the whole diagnosis in miniature. You have two suspects, and each one has an alibi you can check from the driver's seat. There is one wrinkle worth knowing before you start: the direct clutch drum has two separate apply areas, one for Reverse and a different one for 3rd and 4th. Good 3rd and 4th proves the clutch pack itself is alive. It does not prove the Reverse apply passage is sealed.
Step 1: split the circuits hydraulically
Put a gauge on it before you put a wrench on it. You want an analog dial gauge reading 0 to 350 or 400 psi, or a transducer on a scope. TransGo's bulletin #06-178, which covers the 4L80E, 4L85E and TH400, publishes the numbers:
| Range | At idle | Maximum |
|---|---|---|
| Drive | 42 - 65 psi | 165 - 185 psi |
| Reverse | 120 - 125 psi | 280 - 305 psi |
Test line pressure in Reverse, 3rd, 4th and manual 1st, because those are the ranges that use your two suspects. Third and fourth require a road test with the gauge in view. Keep a mechanical gauge and its hose outside the vehicle so a leaking fitting does not dump ATF into the cab.
Two road-test observations do most of the work here. First, how is the 2-3 shift under heavy load? Slippage on the 2-3 points the Reverse complaint straight at the 3rd/Reverse clutch, because that is the same direct clutch. Second, the coast-braking test: in D4 or D3, get the vehicle to roughly 25 mph, lift off the accelerator, then pull the selector back to manual low. When the module commands first, you should feel a strong hold-back from engine compression. No hold-back means the complaint lives in the low/reverse band and its related parts.
Step 2: split the circuits electrically
The 4L80E has a built-in safety that will refuse Reverse on its own. If the control module sees a speed reference greater than about 8 mph during a shift into Reverse, it can block the engagement to keep the parts from breaking. A bad speed reference makes a healthy transmission act like a dead one.
Unplug the transmission case connector. That forces the failsafe pattern and takes the computer's ability to block the shift out of the equation.
- Reverse comes back with the connector off: go do electrical diagnosis and check the speed references feeding the module.
- Reverse still dead: move to the mechanical test.
One caution the TASC Force article spells out, and it has burned people. With the case connector unplugged, line pressure goes to an uncontrolled maximum value. That much pressure can overcome a subtle internal leak that is perfectly capable of killing Reverse at normal pressure. If Reverse returns only with the connector off, do not assume you have proven the hydraulics are healthy. You have proven the electrical side is worth investigating.
Step 3: split the circuits mechanically
This is the test that decides whether the transmission comes out, and it is worth making the tool. Take an old low/reverse servo cover, drill a hole down the center, and weld a nut on top so a bolt can clamp the band mechanically. That takes hydraulics out of the band circuit entirely.
With the tool installed, there are two ways to run it. The pan-off version is fast and messy: you also need a pickup tube cut from an old filter with a hose running to a bucket of ATF, a shield to control spray, and the discipline to start the engine in neutral with the parking brake set before shifting to Reverse. Start in park and shift to Reverse and it will squirt. The pan-on version is slower but clean: install the locking tool so the bolt still clears the pan, reinstall and fill the pan, then make the shift with the parking brake applied and feel for the engine loading up.
The answer is binary and it saves real money:
- Reverse now works with the band locked. The band and drum are fine and the problem is band apply. Pull the valve body and look for blockage in the low/reverse servo feed passages in the case, and for separator plate or gasket faults. On the bench, check the valve body for sticking valves and pay attention to checkballs 7 and 11, which sit in sleeves and are both known troublemakers on this unit.
- Reverse is still dead with the band locked. The unit has to come out.
The servo pin check you can do in the vehicle
Before you commit to pulling anything, TransGo publishes a clearance check that takes about a minute. Push the reverse/low servo pin (the pin only) into its case bore until it bottoms out, holding the band snug against the drum. Now look at the servo pin spring seat, the shoulder:
- About .060 in (1/16) to .125 in (1/8) of the shoulder standing proud of the pin bore: band clearance is in range.
- The shoulder sinks below the top of the case into the pin bore: there is a problem with the drum or the band and the unit needs internal repair.
Understand its limits. It reports clearance only. It will not tell you whether the lining is burnt or the band anchor is broken, and a deteriorated band can still engage Reverse and then slip the moment you touch the throttle, because the lining cannot grab the drum.
While you are in there, check the band anchor areas for cracks and wear and look at the lining in those areas, which is usually where linings start to fail. Check the two anchor pins in the case as well; they are notorious for walking outward, especially on earlier units. On 1996-and-up units, inspect the servo piston for cracks and breaks. To do that properly, remove the pin and springs and check the inside as well as the outside, because a crack across the servo pin area on the bottom of the piston is easy to miss.
On the bench: air test the direct clutch
Once the unit is out, do not tear straight down to the clutch pack. Dismantle only to the point where you can see the direct clutch drum in the case with the valve body removed, then air test the direct clutch through the case and verify that both feed passages apply and hold. Remember there are two of them, one for Reverse and one for 3rd/4th. If it fails, pull the drum and the center support and find out why, then retest.
The most common finding is not a burnt clutch pack. It is wear in the direct clutch drum bore at the center support piston ring locations. Worn ring lands let 3rd and Reverse apply oil exhaust instead of applying the clutch. Sonnax sells a direct drum sleeve kit (34838-01K) specifically to salvage worn drum bores on TH400, 4L80E and 4L85E, and the complaint list on that part reads like a checklist for this job: direct clutch failure, delayed 3rd, delayed Reverse, no 3rd, no Reverse, no 4th, maximum line pressure, 2nd gear starts with the MIL on, and TCC slip codes.
Then check the drum itself. Refinished reaction carriers that end up undersize are common in the aftermarket, so measure rather than trust. The spec is 5.86 inches plus or minus .05 across the widest point, and that figure applies to both early and late carriers. Also install the band-locking tool on the bench, clamp it tight, and verify that the band ends do not touch each other before the band locks the drum. A band whose ends bottom out can never generate clamping force.
The 1996 band-and-drum trap that kills fresh rebuilds
This one deserves its own heading because it is the single most common reason a rebuilt 4L80E comes back with no Reverse. Around the 1995 to 1996 model year GM changed both the drum surface and the band lining, and at the same time changed the boost valve in the front pump that sets Reverse line pressure boost.
| Vintage | Drum (reaction carrier) | Band lining |
|---|---|---|
| Early, pre-1996 | Rougher surface finish | Grooved lining |
| Late, 1996-up | Smooth finish | Smooth lining |
Put a smooth-lined band on an early rough-finished drum and the band will fail, stripping its lining off in short order. The result is no Reverse on a transmission you just built. The drum and band replace each other as a set, early or late. You can run either combination, but you cannot mix them. Early grooved parts are no longer sold new and turn up only as used stock, so in practice most rebuilds go to the late smooth set.
When Reverse pressure is the problem
If a truck keeps eating late-style servo pistons, stop replacing pistons and put the gauge back on it. TransGo's guidance is direct: check maximum Reverse pressure, and if it exceeds 325 psi that alone can lead to failed Reverse components. When Reverse pressure is running that high, suspect a worn EPC boost bushing letting the torque signal drive the pressure regulator past where it should stop.
This is a known weak spot on the 4L80E and 4L85E. Sonnax describes uncontrolled line rise on these units running upward of 500 psi, driven by excessive EPC torque signal pressure, and sells a self-regulating Reverse boost valve kit (34200-10K) that limits EPC pressure to a regulated 95 to 105 psi to stop it. Fix the cause and the servo piston stops breaking.
Two related tuning notes from the same bulletin. A harsh Reverse engagement can often be corrected by reducing servo travel with a longer servo pin, but if a longer pin creates a bind on the 1-2 shift or in manual 2, the band is now too tight and the pin needs to be shorter. Servo pins vary by .174 in from shortest to longest; the most common version, with two thin rings, measures 3.356 to 3.362 in. And if a rebuild comes out with harsh Reverse, check whether the direct clutch wave plate got left out, because that produces exactly that complaint.
Order of operations
- Check fluid level and condition first. Low fluid and burnt fluid both explain a weak or missing Reverse, and both change what the rest of your tests mean.
- Road test against the two tells. Slip on the 2-3 under load points at the direct clutch. No hold-back in manual low points at the band.
- Gauge line pressure in Reverse, 3rd, 4th and manual 1st against 120-125 psi idle and 280-305 psi max in Reverse.
- Unplug the case connector to rule the module and its speed references in or out, remembering that max pressure can mask a leak.
- Lock the band mechanically. Reverse returns means band apply, and you stay under the truck. Still dead means the unit comes out.
- Check servo pin protrusion for .060 to .125 in of shoulder above the bore, and inspect the anchors and piston for cracks.
- On the bench, air test both direct clutch feed passages before tearing down, then measure the drum at 5.86 plus or minus .05 in.
- Match the band to the drum. Grooved to early, smooth to late, as a set, every time.
Preventing the repeat
Almost every repeat no-Reverse on this unit traces back to one of three things: a mismatched band and drum, a worn direct clutch drum bore that was reused because the clutch pack looked fine, or Reverse pressure that was never measured. So whenever a 4L80E is on the bench, measure the reaction carrier, inspect the ring lands in the direct drum bore, confirm the band lining matches the drum finish, and gauge maximum Reverse pressure before the truck leaves. Those four checks take under an hour and they are cheap now and expensive twice.
Need parts for this job?
Reverse bands, direct clutch piston kits, frictions, valve bodies and full master rebuild kits for the 4L80E, shipped from the USA with secure on-site checkout.
Shop 4L80E parts →Related reading: 4L80E low line pressure diagnosis, 4L80E valve body problems and testing, and 4L80E slipping causes and fix.
FAQ
Why does my 4L80E have no Reverse but all forward gears work fine?
Reverse on a 4L80E needs two things at once: the direct clutch and the low/reverse band. All four forward gears can be perfect while Reverse is dead, because the band is only used in Reverse and in manual first. The fastest confirmation is a coast-braking test. Get to about 25 mph, lift off the throttle, and pull the lever into manual low. If there is no engine hold-back, the band side is your problem, not the clutches.
What should Reverse line pressure be on a 4L80E?
TransGo's bulletin for the 4L80E, 4L85E and TH400 lists Reverse at 120 to 125 psi at idle and 280 to 305 psi at maximum, against Drive range at 42 to 65 psi idle and 165 to 185 psi maximum. You need an analog gauge that reads to at least 350 psi. Pressure below spec in Reverse points at a leak or a pump problem; pressure above 325 psi in Reverse is high enough to start breaking the late-style servo piston.
Can you fix a 4L80E no-reverse without pulling the transmission?
Sometimes, and there is a specific test that tells you. With the pan off, lock the low/reverse servo down mechanically and see whether Reverse comes back. If it does, the band and drum are fine and you are chasing a band-apply problem you can reach from underneath: blocked servo feed passages in the case, a separator plate or gasket fault, or checkballs 7 and 11 in the valve body. If Reverse is still dead with the band locked, the unit has to come out.
Why did my 4L80E lose Reverse right after a rebuild?
The most common cause is a band and drum mismatch. GM changed both around the 1995 to 1996 model year. Early drums have a rougher finish and take a grooved-lining band; late drums are smooth-finished and take a smooth-lined band. Put a smooth band on an early rough drum and the lining wears off almost immediately, which reads as no Reverse on a fresh rebuild. The drum and band have to be replaced as a matched set.
What causes the low/reverse servo piston to crack on a 4L80E?
Excessive Reverse pressure. TransGo notes that if a vehicle keeps breaking the 1996-and-up late-style servo piston, you should check maximum Reverse pressure, and that anything above 325 psi leads to failed Reverse components. The usual root cause is a worn EPC boost bushing letting the torque signal run the pressure regulator away. Fix the pressure problem or the next piston breaks too.
Sources
- Sonnax — "Diagnosing the Elusive No Reverse with the 4L80-E," TASC Force Tips. Backs the two Reverse elements (direct clutch, also used in 3rd and 4th; low/reverse band, also used for engine braking in manual 1st); the split-the-circuits method across hydraulic, electrical and mechanical; the roughly 8 mph speed-reference safety that blocks Reverse engagement; the warning that an unplugged case connector sends line pressure to an uncontrolled maximum that can mask a leak; the two separate direct clutch drum apply areas and the through-the-case air test; and the mid-1990s drum-finish and band-lining change that causes rapid band failure when the two are mismatched. sonnax.com
- Transmission Digest — "Diagnosing the Elusive No Reverse with the 4L80-E," Randall Schroeder (Sonnax technical specialist, TASC Force), January 2012. Backs the full published procedure used here: the welded-nut servo cover locking tool and both the pan-off and pan-on versions of the mechanical band-lock test; the instruction to test line pressure in Reverse, 3rd, 4th and manual 1st and to keep a mechanical gauge outside the vehicle; the interpretation table for 3rd/4th present versus absent and engine braking in manual 1st; the direction to inspect the low/reverse servo feed passages, separator plate and gasket when the band-lock test restores Reverse; checkballs 7 and 11 housed in sleeves as known problem areas; and the bench check that band ends must not touch when locked. transmissiondigest.com
- TransGo — Tech Library Bulletin #06-178, "4L80E-85E and TH400 Reverse Complaints," April 4, 2016. Backs the line pressure specifications (Drive 42-65 psi idle / 165-185 psi max; Reverse 120-125 psi idle / 280-305 psi max) and the 0-350/400 psi gauge requirement; the 2-3 slip and 25 mph coast-braking road tests; the servo pin protrusion check at .060 to .125 in of spring-seat shoulder above the bore; the reaction carrier diameter spec of 5.86 plus or minus .05 in and the warning about undersize refinished drums; the pre-96 grooved versus 96-up smooth drum and band sets and the rule that they replace each other as a set; the band anchor and anchor-pin inspection points and late servo piston crack check; the 325 psi maximum Reverse pressure threshold and worn EPC boost bushing as its cause; and the servo pin dimensions (.174 in spread, most common two-thin-ring pin at 3.356-3.362 in) plus the direct clutch wave plate omission causing harsh Reverse. transgo.org
- Sonnax — Direct Drum Sleeve Kit 34838-01K, product and application data (TH400, 4L80-E, 4L85-E). Backs the direct clutch drum bore wear mechanism at the center support piston ring locations allowing 3rd and Reverse apply oil to exhaust, the fitment across early and late 4L80-E drums, and the published complaint list quoted in this article: direct clutch failure, delayed 3rd, delayed Reverse, no 3rd, no Reverse, no 4th, maximum line pressure, 2nd gear starts with MIL on, and TCC slip codes. sonnax.com
- Sonnax — Boost Valve Kit 34200-10K, self-regulating Reverse boost valve for GM 4L80-E and 4L85-E. Backs the uncontrollable line rise condition running upward of 500 psi and high line pressure in Reverse caused by excessive EPC torque signal pressure, and the kit's regulation of EPC pressure to 95-105 psi via a drop-in encapsulated relief valve as the correction for the pressure condition that breaks late-style servo pistons. sonnax.com
4L80E master rebuild kit with band → or browse all 4L80E parts →