On a 5R55S or 5R55W, the valve body gets blamed for almost everything, and a lot of the time it deserves it. Ford's own symptom charts for this unit list "valve body (sticking valves)" and "incorrectly tightened valve body bolts (cross-leaks)" under nearly every shift complaint, from harsh engagements to no reverse to slipping upshifts [1]. The trouble is that the same complaints come from solenoids, wiring, a worn servo bore or a burned band. Swapping a valve body on a hunch is how a lot of Explorers come back a month later with the same problem.
This guide covers which 5R55W/S valve body bores wear, what each does to the way the truck drives, and how to prove it with a gauge, a meter and a vacuum tester before you spend money. Specs come from Ford's service information and Sonnax's wear data, listed at the bottom. Where something is my shop habit rather than a published procedure, I say so.
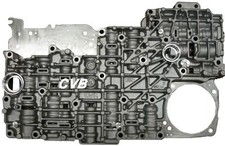
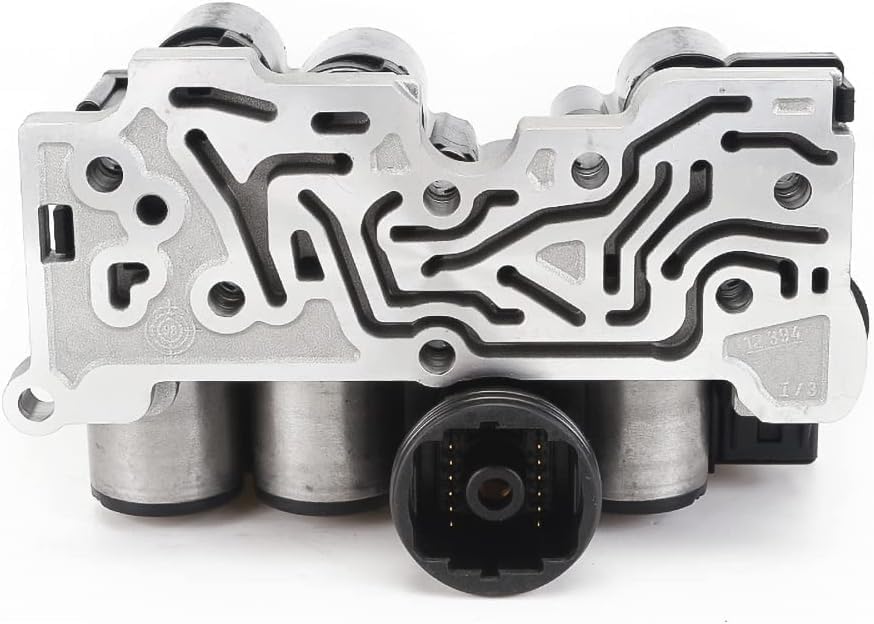

What's in the 5R55S valve body
There are really two assemblies bolted together under the pan. The main valve body holds the spool valves: the main pressure regulator, the VFS modulator control valves, the TCC modulator and control valves, the engagement valves for forward and reverse, and the servo control valves. Under it sits the separator plate and gasket.
Bolted to that is the solenoid valve body. Per Ford's diagnosis manual it holds three variable-force pressure control solenoids (PC-A, PC-B and PC-C), four on/off shift solenoids (SSA, SSB, SSC and SSD) and the PWM torque converter clutch solenoid. The PC solenoids set line pressure and the apply pressure for each band and clutch. The shift solenoids are normally open three-way units that route control pressure to pick the gear. The transmission fluid temperature sensor lives on the solenoid body too [1].
That layout matters for diagnosis. The PCM commands a pressure through a PC solenoid, but the pressure that actually reaches a band or clutch has to pass through a modulator valve in the main valve body first. If that valve's bore is worn, the solenoid can be perfect and the band still gets short-changed.
Symptoms by worn valve
Sonnax publishes a critical wear map for the 5R55W/S, and it lines up well with what comes across the counter [3]. The main ones:
| Worn valve or bore | What the driver notices |
|---|---|
| TCC modulator valve | P0741, excess converter slip, overtemp code 1783, high line pressure, overheated transmission |
| Main pressure regulator valve | Delayed engagement, soft shifts, low line rise, erratic buzz |
| VFS1 / VFS2 modulator control valves | Flare shifts, low line pressure, pressure control out-of-range codes |
| Solenoid and converter feed limit valve | No lockup, overheating, delayed engagement |
| Reverse engagement / reverse modulator valves | Delayed or no reverse, burned direct clutch, slipping gears |
| Forward engagement valve | Delayed forward, loss of forward, burned forward clutch |
| Intermediate servo select / release valves | No 4th or 5th, burned intermediate band, burned direct clutch |
Sonnax's "Figuring Out the 5R55 Alphabet" article adds the order they tend to go in. The TCC modulator bore and the main regulator bore wear first, because they're the busiest valves in the body. As cycle count piles up, especially in stop-and-go driving, the VFS modulator bores wear and clutch and servo apply pressure drops. The PCM's adaptive strategy covers for it for a while by commanding more pressure. Once the wear outruns the adaptives, you get gear ratio codes and slipping. Sonnax makes a point I agree with: at that stage the solenoid or the servo pin bore usually gets blamed, when the real problem is that the VFS modulator valves can't deliver enough pressure [4]. Servo pin bore wear is real on this unit too, and we cover it in the servo pin bore guide. The point is to test before you pick one.
Step 1: separate electrical from hydraulic
Run the quick test and write down every code. Ford's DTC table tells you a lot about which solenoid is involved and which way it failed:
- P1746 (PC-A open): maximum PC-A pressure, harsh engagements and shifts.
- P1747 (PC-A short to ground): low pressure, torque limiting, slips in gear, 3rd gear incorrect.
- P0775 / P1789 (PC-B circuit): low PC-B pressure, torque limiting, no 2nd and no 5th.
- P0750 / P0753 (SSA): shorted means no 4th or 5th; open means no 1st.
- P0755 / P0758 (SSB): shorted means no 1st; open means no 3rd.
- P0765 / P0768 (SSD): no engine braking in manual gears.
A hard electrical code points at the solenoid body or harness, not the spool valves. Check it at the 16-pin case connector. Ford's resistance spec is 16 to 45 ohms for SSA, SSB, SSC and SSD and 9 to 16 ohms for the TCC solenoid. Then measure from chassis ground to terminals 3, 5, 6, 14, 15 and 16. Ford says if any reads under 5 ohms, replace the solenoid body. For harness checks Ford treats more than 5 ohms end to end as an open, and less than 10 k-ohms to ground as a short. Wiggle the harness while watching the PIDs; a dropout when you flex the connector is a wiring repair [1].
If the electrical side checks good and the complaint is still there, you're into hydraulics, and that's where the gauge comes out.
Step 2: line pressure and pressure control tests
Ford's procedure: connect a scan tool to watch engine rpm, pull the line pressure tap and connect a gauge, set the service and parking brakes, and read pressure in every range. Ford's caution is to do this before any stall test, and never hold wide open throttle in any gear for more than 5 seconds. If line pressure is low at stall, you'll do more damage testing it [1].
| Range (Explorer/Mountaineer) | Line at idle | Line at WOT stall | Pressure control at idle |
|---|---|---|---|
| P and N | 75-120 psi | n/a | 20-40 psi |
| R, 4.0L | 145-190 psi | 282-350 psi | 40-50 psi |
| R, 4.6L | 175-215 psi | 282-350 psi | 55-65 psi |
| D, 3, 2, 1, 4.0L | 80-110 psi | 228-263 psi | 25-35 psi |
| D, 3, 2, 1, 4.6L | 100-135 psi | 228-263 psi | 40-50 psi |
Pressure control at WOT stall is 112-134 psi in every range. If line pressure is out, Ford has you move the gauge to the pressure control tap and read that. If the control pressure is off too, run Ford's PC solenoid test (Test D). If control pressure is good and line is still wrong, the problem is downstream of the solenoid, and that's the valve body, the pump or a leak.
Ford's line pressure results chart is the most useful part of this whole procedure because it narrows the suspects by range:
- High at idle in all ranges: wiring harness, boost valve, PC solenoid or main regulator valve.
- Low at idle in all ranges: low fluid, bad filter or filter seal, loose valve body bolts, pump or pump gasket leak, case leak, faulty valve body or separator plate.
- Low in P only: valve body.
- Low in N only: valve body, overdrive servo or intermediate servo.
- Low in R only: separator plate, rear servo cover or piston leak, reverse clutch, overdrive or intermediate servo, valve body or forward clutch.
- Low in manual 1: forward clutch or valve body.
Step 3: bench test the valve body
Once it's off the truck, don't just clean it and eyeball it. The wear that causes these complaints is often a few thousandths of clearance at a spool, and it doesn't always show.
Vacuum testing
Sonnax's 5R55W/S vacuum test guide shows every critical test location on this valve body. The idea: seal the valley around a valve, pull vacuum at the port, and read how well it holds. A low reading means wear. Sonnax's test plate kit (56947J-VTP) covers the whole casting and seals the passages at once, which makes it quick. Sonnax also recommends testing ten cores and recording the numbers so you know what "normal" looks like for each bore. That's worth doing if you build these regularly. Valves are tested in their rest position unless the guide says otherwise [3] [6].
Wet air test
Sonnax describes a wet air test for the 5R55N, W and S. Pull the solenoid base plate, reattach it over the separator plate, and inject ATF with 40 to 60 psi of air into the circuits. A good body strokes the valves cleanly without heavy leakage or bubbling out of the exhaust slots. Sonnax notes that excessive bore wear aerates the fluid in service, and that aerated fluid reads high on the level, can vent out of the case and causes erratic pressure. If you've got a 5R55S puking fluid out the vent with a correct fill level, keep that in mind [4].
Step 4: the solenoid body details that cause comebacks
Plenty of 5R55S jobs are "fixed" with a new solenoid pack and come back. Sonnax lists a few reasons.
- Wrong base plate or filter. The solenoid assembly looks like it swaps between the N, W and S, but the base plate and the filter under it are different. Mixing them costs you reverse, TCC apply and solenoid oil pressure. The filter is part of the gasket, and solvent ruins its silicone bead, so don't soak it if you're reusing it.
- Loss of prime. VFS solenoids ship with fluid in them, but it drains out during handling. Sonnax's advice is to fill the circuits with fresh MERCON V and pull fluid through the solenoid with vacuum before installing it.
- Old fluid. Sonnax notes the factory fill before May 2005 was an early MERCON V that degraded solenoids. Ford released an additive (4L2Z-19B546-AB, XL-11) under FSA 04B22, and the final fix was revised MERCON V, XT-5-QM. Any leftover old fluid can shorten the new solenoid's life.
- Adaptives and grounds. Units built after 2002 have adaptive strategy, so do a relearn with the solenoid service. Sonnax also says to check the grounds at the battery and PCM and clean the MAF [4].
Step 5: reassembly specs
Ford's service procedure for the Explorer and Mountaineer:
- Install two valve body alignment pins (T95L-70010-C) in the case, start the valve body bolts finger tight, then remove the pins and install the last two bolts.
- Install the solenoid body bolts and tighten them in Ford's sequence to 71 in-lb.
- Rotate the manual lever through all ranges, set it in Neutral, reinstall the TR sensor and check its adjustment (TR sensor bolts 89 in-lb).
- Pan bolts 97 in-lb. Converter drain plug 89 in-lb, and Ford calls for a new one.
- Fill with MERCON V and set the level by the check procedure. Total capacity is about 12.6 quarts [2].
Before you swap: match the valve body to the model year
A replacement valve body only fixes the truck if it is the right one. Beginning with the 2009 model year, Ford fitted the 5R55S with a redesigned valve body casting and bonded spacer plate, with changes to the VFS1, VFS2 and line pressure passages, and Transmission Digest's December 2018 Tech Talk states that none of the 2009 valve body and spacer plate parts retrofit to earlier applications [7]. ATSG has seen shops put the 2009 plate (Ford 9L2Z-7Z490-B) on an earlier valve body; its extra hole feeds line pressure into the VFS2 circuit and gives a harsh 1-2 upshift and a 2-3 flare [7]. If a valve body swap made the shift quality worse, check the casting and plate year before you blame the new part.
My diagnostic order
This is my sequence, not a Ford procedure:
- Check fluid level and condition. Burned fluid with friction material means a band or clutch is already hurt.
- Scan codes and clear electrical faults first at the 16-pin connector.
- Gauge line pressure in every range, then the pressure control tap, and read Ford's results chart.
- If the valve body is the suspect, vacuum or wet air test the TCC modulator, main regulator and VFS modulator bores first.
- Repair worn bores or replace the valve body, and check the servo pin bores while you're in there.
- Reassemble to Ford's specs, prime the solenoids, fill with MERCON V and run a relearn.
Sonnax oversized VFS modulator control valve kit 56947J-19K for the 5R55S
If the vacuum test shows the VFS modulator bores are worn, which causes flare shifts, low line pressure and pressure control codes, this is the Sonnax repair kit. Sold by our sister store, CoreTransmissionParts.
Shop the part for this fix →Need a TCC modulator kit, a solenoid regulator valve or a main regulator part instead? The 5R55S parts collection has them.
Need parts for this job?
Our 5R55 parts page carries complete 5R55S and 5R55W valve bodies, solenoid packs, TCC solenoids, filter and pan gasket kits and rebuild kits for the Explorer, Mountaineer and Mustang. Checkout is on site.
FAQ
What are the symptoms of a bad 5R55S valve body?
Common ones are delayed or harsh engagements, flare or slipping shifts, no reverse or delayed reverse, converter slip codes like P0741 and overheating. Sonnax ties each to a specific worn bore: the main regulator for delayed engagement and soft shifts, the VFS modulator valves for flare shifts and low line pressure, and the TCC modulator for slip and overtemp codes.
How do I test a 5R55S valve body without removing it?
Put a gauge on the line pressure tap and read every range at idle and at stall, keeping wide open throttle under 5 seconds. For a 4.6L in Drive, Ford specifies 100-135 psi at idle and 228-263 psi at stall. If line is out, check the pressure control tap, then use Ford's results chart to narrow it down: low in Park only, for example, points at the valve body.
Is it the solenoid pack or the valve body on a 5R55S?
Check the electrical side first at the 16-pin connector. Shift solenoids should read 16-45 ohms and the TCC solenoid 9-16 ohms, and any terminal under 5 ohms to ground means replace the solenoid body. If the solenoids test good and pressure is still wrong, Sonnax says worn VFS modulator bores are often the real cause and the solenoid gets blamed for it.
What is the torque on 5R55S solenoid body bolts?
Ford specifies 71 in-lb, tightened in its sequence. Start the valve body bolts using alignment pins T95L-70010-C, and tighten pan bolts to 97 in-lb. Uneven bolt torque is on Ford's list of cross-leak causes, so follow the sequence.
Related guides
- 5R55S Shift Solenoid Symptoms and Replacement
- 5R55W/5R55S Servo Pin Bore Wear
- 5R55S Limp Mode Causes and Fix
- 5R55S Torque Converter Lockup Shudder Fix
- 5R55 Harsh or Delayed Shifts: A Diagnostic Walkthrough
Sources
- Ford service information via Mitchell1, "2002 Automatic Transmissions 5R55W/S Diagnosis" (Explorer). Backs the solenoid body contents (PC-A/B/C, SSA-SSD, PWM TCC), the valve body and cross-leak entries in the symptom charts, the DTC table and failure effects, the solenoid resistance specs, the 5-ohm and 10 k-ohm circuit checks, the line pressure and pressure control procedure and specs, the 5-second WOT caution, and the line pressure results chart. Ford/Mitchell diagnosis (PDF)
- Ford service information via Mitchell1, "2002 Automatic Transmissions Servicing - Explorer & Mountaineer" (5R55W/S). Backs the valve body removal and installation steps, alignment pins T95L-70010-C, solenoid body bolt torque and sequence, pan bolt, converter drain plug and TR sensor torques, and the MERCON V fill. Ford/Mitchell servicing (PDF)
- Sonnax, "Ford 5R55W/S Vacuum Test Guide." Backs the critical wear areas and the symptoms tied to each valve (TCC modulator, main regulator, VFS modulator, feed limit, engagement and servo valves) and the vacuum test locations. sonnax.com
- Sonnax, "Figuring Out the 5R55 Alphabet." Backs the order of bore wear, the VFS modulator wear being blamed on solenoids and servo bores, the base plate and filter differences, loss of prime, the early MERCON V fill and FSA 04B22 additive, the adaptive relearn, and the wet air test at 40-60 psi. sonnax.com
- Sonnax, 5R55W/5R55S TCC Modulator Plunger Valve Kit 56947J-03K. Backs TCC modulator sleeve wear from the PWM solenoid, rising slip rate and the rapidly wearing bore inboard of the sleeve. sonnax.com
- Sonnax Engineering and Technical Services, "Vacuum Testing Ford 5R55W/S," TASC Force Tips, Transmission Digest (October 2013). Backs vacuum testing as the bench check for this valve body. transmissiondigest.com
- Transmission Digest, Tech Talk, December 2018, "Ford 5R55S: Avoid 1-2 harsh shifts and 2-3 flared shifts." Backs the 2009 model-year valve body casting and bonded spacer plate change (VFS1, VFS2 and line passages), the non-retrofit warning, the extra line-to-VFS2 hole when a 2009 plate is used on an earlier body, and spacer plate 9L2Z-7Z490-B. transmissiondigest.com